Happy Monday friends! I'd like to start of the week with some cards share. And because we are in the Holiday season, I picked the ones that are applicable for this time of the year...
Happy Holidays
Size: 4 1/8” x 4 1/8”
Supplies Used:
Pattern paper-Winter Wonderland, My Little Shoebox; Stickers- (epoxy) Holidazzle, Creative Memories; (tree) Winter Wonderland, My Little Shoebox; Stamps- Bows and Holly, Lawn Fawn; Ink- (black) Jet Black, Stazon, Tsukineko; (red) Cherry, American Crafts; (raspberry) Versacolor, Tsukineko; Pen- Black, Dual-tip, Creative Memories; Scallop Scissor- Fiskars; Dies- Classic Scallop circles large, Spellbinders; Adhesives- Perma tac, u cut it foam, Raisen’s, Mini Square- Glue Arts; Flower- Pink, Accent Creative Designs
Instructions: Fold your pink pattern paper into a card sizing about 4 ½” square. Run it through the die cut machine using the circle scallop circle die. Cut another piece of scallop circle paper using the grey pink dot paper. Emboss the edge as well. Ink the edges of the pink/grey dot paper and adhere to the circle card. Cut a piece of green snowflake paper that is about 1 ½” in width and 5” in length. Cut the edges with scallop scissor. Place another pattern paper on top of the border. Adhere the layered border piece on the bottom portion of the card, cutting the left and right edges into notches. Stamp the gift box and tag images onto pattern paper. Set it aside to dry. Wrap the twine around the bottom paper strip twice. Secure the ends on the back side of the card. Adhere the Christmas tree sticker and flower onto the card. Cut the gift box and tag accent and adhere to the card. Place the epoxy stickers on the sticker and stamped images.
Notes: I used a die cut machine to make my shaped card. I place the die a little above the top of the fold of the paper so I won’t cut the fold of the card. I mainly used a pink color scheme on this card but with the tree, snowflake and gift box accent still keeps the Christmas/Holiday theme in the card
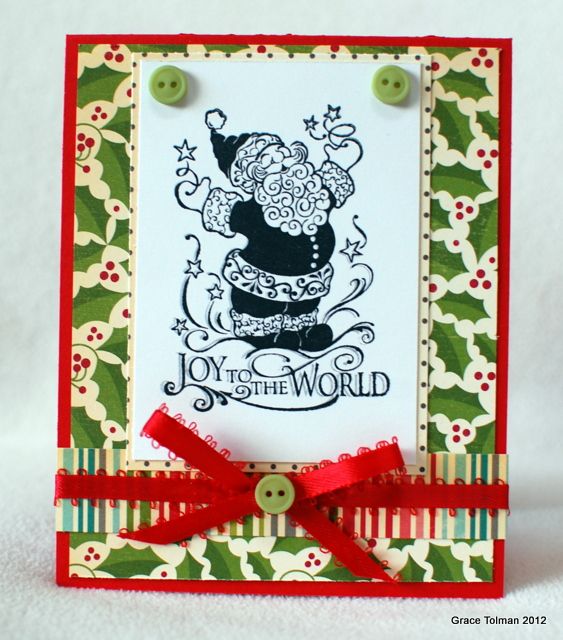
Joy to the World
Size: 4 x
5”
Supplies
Used:
Cardstock-
(red and white) WorldWin; Pattern papers- Holiday Style, October Afternoon;
Buttons- Traditions, Fancy Pants Designs; Ribbon- Red, Offray; Stamp- Holiday
Expressions, Inkadinkado; Ink- Jet black, Stazon, Tsukineko; Adhesives- Perma
tac, Mini Square- Glue Arts
Instructions:
1.Stamp the image onto white cardstock using
black ink. 2. Make the card base using red cardstock 3. Cut a piece of the
holly leaves paper that is ¼” smaller than the card base and adhere to the
center of the card. 4. Cut a ¾” strip of striped paper and adhere to the bottom
of the card. 5. Wrap the red ribbon on top of the striped paper and adhere the
ends. 6. Make a bow with the red ribbon and adhere to the center of the ribbon
strip. Add a tiny green button in the center of the bow. 7. Cut out the Santa
image to a 3 ½” x 2 ½” block. Mat with black/beige dot paper and adhere to the
center of the card. 8. Add two green tiny buttons on the top corners of the
block.
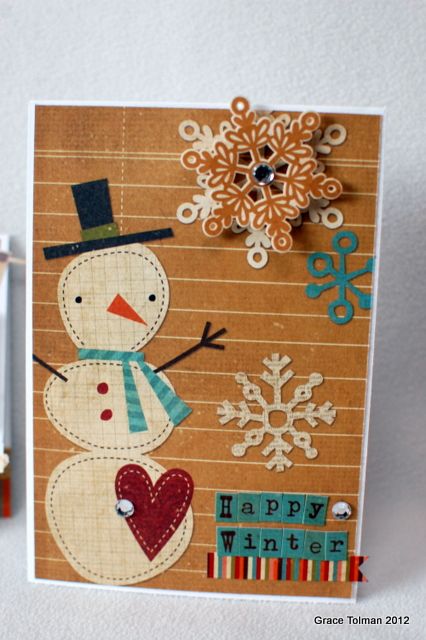
Happy Winter
Size: 4 ¼”
x 6”
Supplies
Used:
Cardstock-
White, WorldWin; Pattern paper and stickers- Year-o-graphy, Simple Stories;
Bling- Creative Charms; Adhesives- U cut it foam, Perma tac- Glue Arts
Notes:
This card
was made super easy with coordinated products
Instructions:
Trim
pattern paper 1/8” smaller than the card base and adhere. Place a striped
sticker on the bottom right side of the card. Place the letter stickers above
it to spell out “Happy Winter”. Place a snowflake sticker on top of the
snowflake design on the paper using foam adhesive. Place rhinestone on three
different spots of the card to create a visual triangle.
Snow card
Size: 4 ¼”
x 5 ½”
Supplies Used:
Cardstock-
WorldWin; Pattern papers, chipboard, Stickers- Twig, Little Yellow Bicycle;
Button- Fancy Pants Design; Paper Trimmer with Decorative blade- Creative
Memories; Adhesives- High Tac, Mini Squares, U cut it foam, Raisen’s- Glue Arts
Notes:
I love
adding embellishments with dimensional adhesive to give the project texture and
layers.
Instructions:
Make the card base with cardstock. Cut a piece of blue dot paper that is 1/8”
smaller than the card base. Cut this piece using a decorative blade attachment
to a paper trimmer. Cut a piece of brown snowflake paper that is 4” x 5 ¼” in
size. Measure ½” all round the snowflake paper, make measurement lines on the
back side of the paper and cut out a frame.
Adhere to the card. Place the chipboard snowman, chipboard snowflake and
sentiment accents on the card using dimensional adhesive. Add a small blue
button in the center of the chipboard snowflake using mini square adhesive.
Notes: I cut the brown snowflake paper into a frame so I won’t lose any of the
beautiful design of the blue dot paper in the background.
I hope you all have a great start to your week.
Till next time,
Grace
P.S Does this new format of sharing my cards with supplies and instructions better for you? Let me know so I can start doing it like this from here on out. :)


No comments:
Post a Comment