Everyone has a story to tell, here's mine sprinkled with some creative projects along the way.
Thank you for stopping by and I hope you come back again.


Friday, May 31, 2013

Getting re-acquainted with my sewing machine

Once in a while I would get this boost of motivation and inspiration to create something with fabric. It doesn't come very often but when it does, I can't resist but get cozy with my sewing machine. 

A few weeks ago, we had a rainy day and since I didn't have any projects due, I spent the afternoon making pretty things with fabrics. Here are some of the results of my sewing labor...

Infinity scarves are a rage right now. I remember going to the mall and seeing each of my fave stores carrying some kind or type of these scarves. I recall telling myself that I can make one instead of paying the $20 or so dollars for it. And that's exactly what I did in this sewing session...

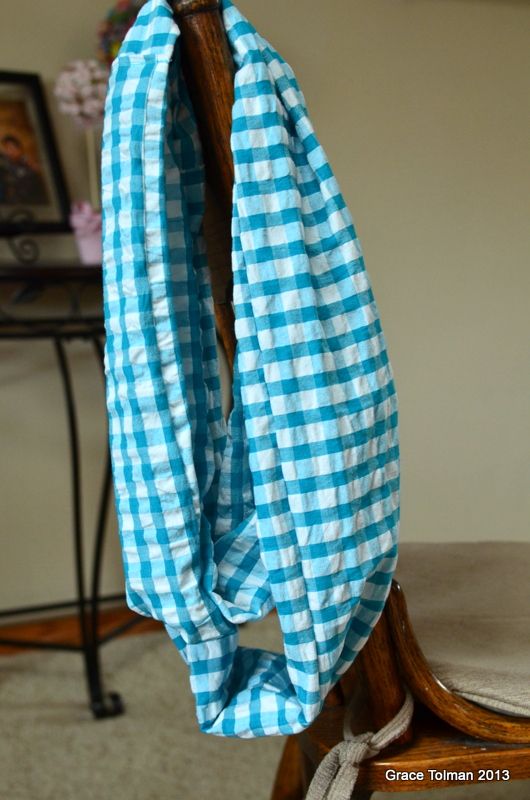
I'm the kind of crafter that doesn't like to follow rules. I think that's why I haven't been able to embrace sewing as much as I would like to. There's so many measurements and steps to follow. With this scarf, I got a fabric (in my stash) that I thought was long enough to double around my neck. I cut the material into two 5" wide pieces. Sewn the sides of the long pieces together, right sides facing each other, turned it over, folded the ends and sewn the piece to close. 

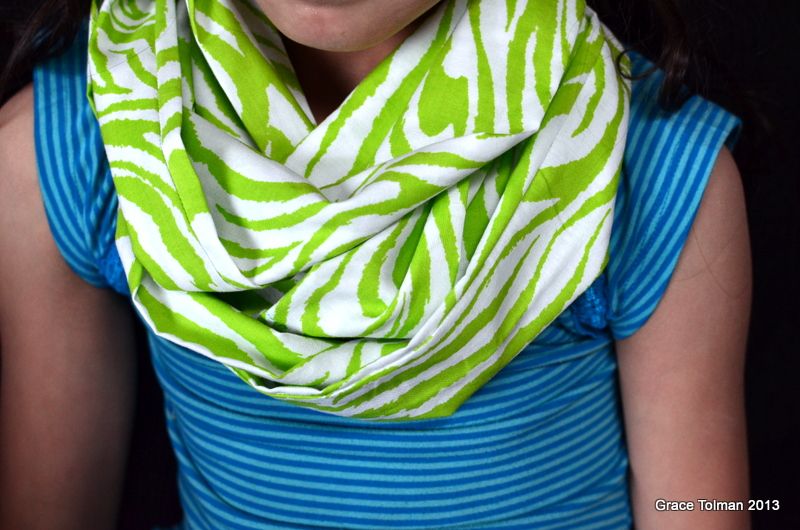
My daughter saw what I was making and she wanted one too. I made her choose the fabric and here's her version, a slightly smaller one. I love that I got her to model it for me. 


That morning, I was at Hobby Lobby purchasing some fabrics for a baby necktie that I was going to make (that's my first sewing project of the day) and saw this super cool chevron print. I had a 40% coupon in my hand and knew that I would regret it, if I didn't use it for this print. I ended up creating this pillowcase for my front room. 


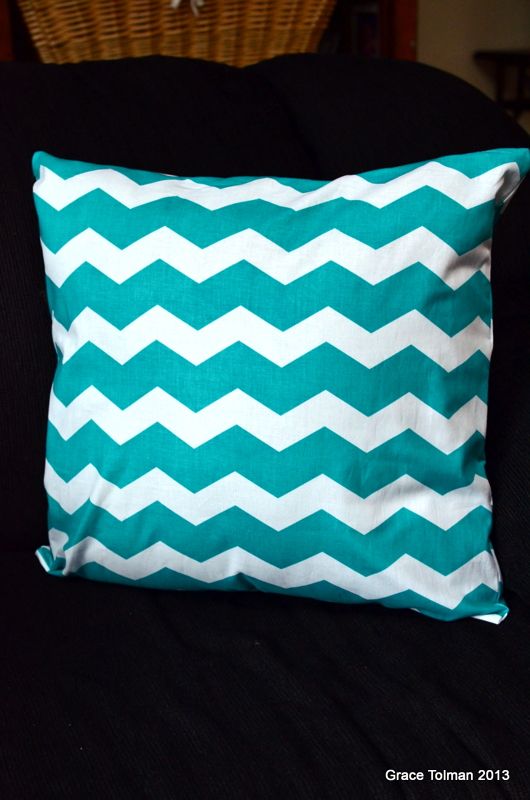
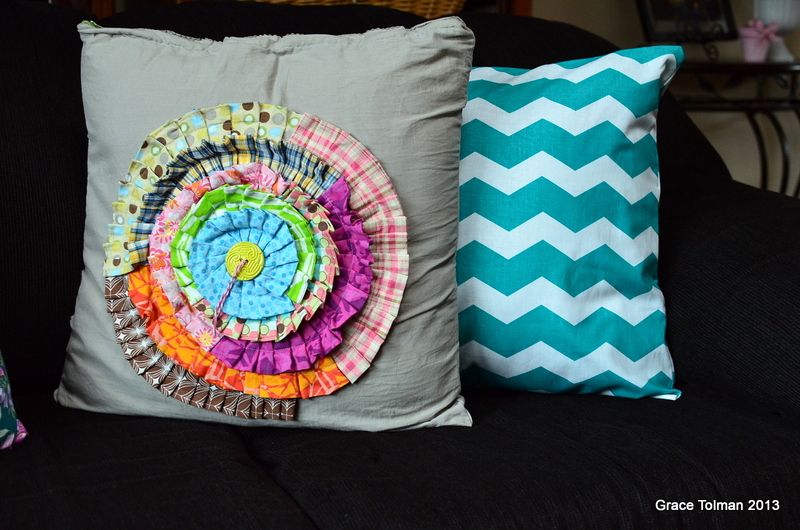
Now my other handmade pillow has an equally cool partner. *wink*

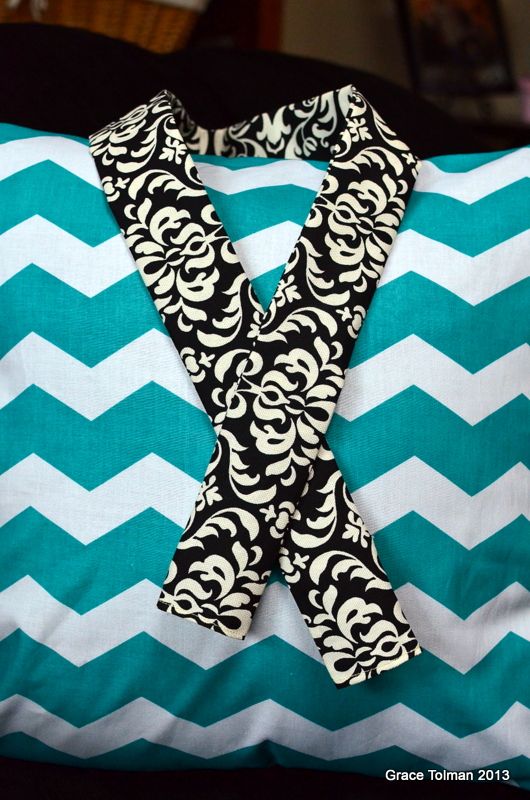
So let's recap, I made a baby necktie, two infinity scarves and then a chevron pillowcase. But I didn't stop there. At Hobby Lobby, I also found this great damask print in the fabric remnant aisle. There wasn't much of this fabric but I loved the canvas texture so I made a camera strap with it. My camera strap tutorial can be found here. Because of the beauty of this fabric print, I decided to keep it simple and not add any ruffles to the strap. I wanted this item to have an understated elegance. 

So there you have it. An afternoon of re-igniting my love for sewing and making pretty things with fabrics. 

What have you sewn lately?

Have a great weekend.

Till next time,
Grace

Thursday, May 30, 2013

Meet Mr. Fishy

Before the school ended for my kids, the school's Science teacher sent out a note home with the 4th graders. The note mentioned a good amount of gold fish that needed homes since the Science room will be closed for the summer. My kids were begging me to sign the slip so we can keep one. We didn't have to pay for the fish but we needed a commitment to keep it alive. 

But after consulting Mitch, we decided to give in. The kids have been wanting a pet for so long but both of us knew that we would have to bear more of the taking care of this animal than the kiddos so we've always said no. We didn't have the time nor the energy to devote to that kind of commitment. But then this fish idea came along and I thought that it was a less stressful way to introduce "pet responsibility" to the children. 

When I was a teenager my dad took on the hobby of fishes so at one point we had about three fish tanks in our home. We, the kids, had to clean these tanks and I was always upset with that job because we ended up killing some of these poor creatures as we transferred them from one container to another. Needless to say, I don't have good memories with taking care of fishes but for my kids, I'm changing my views on it. 

And with that, last Wednesday, after I got done with my volunteer work at the kids' school, I took home what would later be known as Mr. Fishy. 

Meet the latest addition to the Tolman family... 
We had a big vase/bowl that we decided to use as his home. I told everyone that we will not get into debt with this new "toy" so right now all he has is this bowl with the views of the backyard. 

Mr. Fishy seems like the shy type cause every time we come close to his abode, he quickly swims to the bottom of the tank. 

I've noticed that since we don't have an oxygen tank in the bowl, his water gets dirty pretty fast so we've been changing the water every other day. The kids have been great at reminding me to clean the tank and to feed the fish. Like I said, I personally don't have the time nor energy to devote to Mr. Fishy and I'm glad that the kids are taking the initiative to remind me of him. 

So there you have it, the kids' first pet. I made a mistake of telling the kids that if Mr. Fishy survives two weeks that we'll get him a friend. So far, he's looking good and the kids are holding me to my word. Oh boy, what did I get myself into?

What was your best pet memories? 

Till next time,
Grace

Wednesday, May 29, 2013

Latest projects

We are near the end of the month and that means that I'm a busy bee trying to get my June design team projects finished before the deadline. So while I "play" away in my scrapbook room, how about a share of my latest projects posted online?

I made a card using the Oval shape tool of Epiphany crafts. I challenged myself to create something extraordinary with this tool, so I created some tulip flowers for my card. See the card and tutorial in this blog post at Epiphany Crafts blog. 

This card featured one of the latest Express Edge die from Die-Versions. My favorite part of this card was that I was able to use up a lot of my cardstock scraps. You can see this card plus more examples on how to use this die here. 

Thanks for stopping by and I hope you find some inspirations from this post to help you with your own crafting today. 

Till next time,
Grace

Tuesday, May 28, 2013

Anniversary date/family time

Two Saturdays ago my husband and I celebrated our 11th year wedding anniversary. It was definitely a day to celebrate and we decided to make it a family affair. So we took the kids to watch "Jack the Giant Slayer" at the cheap theater and then we got to experience some French Cuisine at La Baguette. Here are some of the pictures from our family excursion...

Mitch has been wanting to see this movie since it came out. I thought the movie was well done and that the actors were pretty good. I was a little bummed out that they didn't talk about what had happened to the other characters of the movie besides the main ones.

A good friend of ours gave Mitch a gift card to a French bistro in town, as a graduation gift. So in this trip, we decided to use it for a "french experience". We figured that this might probably be the closest thing we can get to France so we took the plunge. 

Our poor waitress had to really educate us with the food as we didn't have any clue on what to try. We ended up getting these...

I got a swiss and ham sandwich topped with egg. I ordered a side of fries which was tossed with some herb mixture. It was pretty tasty. 

Mitch ordered the Beef Bourguignon. I had only heard this from Julia Child so it was pretty interesting to actually taste it. In my understanding it's the French take on Beef stew but it is simmered in some wines to add the European flavor. 

The kids split an order of roast beef sandwich with Au jus sauce. I had to teach them how to use the sauce which later on, I ended up using more of, in my sandwich. It was quite delicious!

And we couldn't end the night without having something sweet, so we all shared this gorgeous plate of lemon cake with whipped cream and berry sauce. Yum-o!

When we got home I had Marcus take a picture of me and Mitch so we have something to remember this anniversary with. 

So that's how we celebrated this year's anniversary. Now I want to know, what was your most unforgettable anniversary date? 

Till next time,
Grace

Monday, May 27, 2013

Teacher gifts

Hi there friends and happy Monday. For my American friends...Happy Memorial day. The weather is great in my "neck of the woods" so the family and I are planning on enjoying this special holiday outdoors. But before I step out and bask in the beauty of the sunshine here's some project shares...

NEW VIDEO TUTORIAL HERE. I'm confused as to why blogger is not letting me add my latest video tutorial here but here's the picture of the layout I made. The topic I tackled in my tutorial is ideas on how to use 6x6 paper pads in your layouts. Hope you like it. :)

So last Friday marked the last day of school for my kids. This meant that I had some special teachers to thank, and the only way I know how to do that is to make crafty presents for them. Here's a couple of projects I've created. I didn't want to share these project in the blog before I delivered my gifts to the teachers to keep the whole thing a surprise *wink*

These are tile coasters that have been treated with Chalkboard paint. I found the idea and tutorial on Pinterest. Don't you love that site? Here's the direct link

I love how inexpensive this project is. The tiles and chalkboard paint were all purchased at Home Depot and  since I only made 5 sets, I have TONS of paint left. I already have ideas swirling in my head to use up the leftover paint. I have a feeling I'm going to chalkboard-ize parts of my home in the upcoming months ;)

It took me about two nights to work on these coasters. You need to wait a while in between coats but if you have a show that you like to watch, this is a great project to keep your hands busy while you catch up them.
I added some ribbon and chalk plus a tag to the sets to make the gifts complete. 

Another project that kept me busy was this book...
We had a great teacher leave our school this year and because she had both my children in her class, I thought it would be good to send her off with a book of remembrance. This mini album was definitely a group effort. I had a good friend who knew a lot of people in the school so I gave her a bunch of blank cards which she had teachers, staff, parents and students write on. I also talked to some parents in my daughter's class and most of them got some pictures and written notes back to me. And then another good friend helped me put the book together. I know that I wouldn't have been able to put this project together without the help of great friends and parents. 

Here's a peek at the book. *Note: Because this is a combination of pictures and words from different individuals, especially children, I am opting to just share my children's page in the efforts of keeping other people's internet privacy. :)


I got the 6x6 mini album from Michael's and all other supplies are from my stash. Papers are from My Mind's Eye, Washi tape from Hambly Screen Prints, Stickers from different sources and Stamp from Technique Tuesday. 

Thanks for stopping by and have a fantastic week. 

till next time,
Grace

Thursday, May 23, 2013

Dream a little dream layout *GCD Studios Pure Bliss Collection*

 Hi there friends. Our children takes up the majority of our scrapbook pages. And sometimes it gets a little redundant. I mean, they have yearly birthdays, first day of school, holiday events and everything in between. That’s why with this layout I decided to write a special letter to my daughter to change out things a little bit. This page was actually inspired by the title that I had cut out from a pattern paper in the Pure Bliss collection then I wrote 10 reasons why I wanted my little sweetie to never stop dreaming.


I wanted to make this “letter” to my daughter very personal so I handwritten my journaling.


I dressed up my title circle with epoxy dots and adhered it with foam adhesive to add dimension to it.


Little bits of fun stickers and pins finished off my page. 

Products used: Pure Bliss (#2018 Happy Hoops; #2019 Alphabet; #2024 Dainty Floral; #2025 Journal tags;  #2035 Paper Clips; #2036 Die cut borders; #2033 Label Stickers; #2034 Brads); Happiness (#1868, Glitter Epoxy Dots)

Other supplies: Cardstock, twine, flowers, pen, letter stickers  

Thanks for stopping by.

Till next time,
Grace

Wednesday, May 22, 2013

Happy Birthday card *Inspired by Stamping*

Hi there friends. This week is going by way too fast for me. I'm in the middle of creating gifts for my kids' teachers, making projects with upcoming deadlines and not to mention school homework for me. Whew! Needless to say, I'm looking forward to the weekend. 

Speaking of looking forward, my son's birthday is in two months and he's already planning and, dare I say, making a list of gifts he'd like to receive. I guess in any child's mind, birthdays are the coolest. I wish I still look forward to my birthdays like he does. *wink*

But I will look forward to my birthday if I received a handmade card like this...

Happy Birthday To you card
I created this card with the recent Cardabilities sketch in mind. You can find the sketch and the many inspirations the design team offered in this blog post

I used items in my scrap stash along with one of my fave stamps right now, which is the Washi stamp set of Inspired by Stamping. I also added a sentiment stamp, from Inspired by Stamping as well. 

When I was writing down the supply list for my card, I realized that I used a lot of products in creating this project. I love products but I think I'm going to challenge myself next time to limit the products I use in a project to about 5. Oh! the thought of it already makes me uneasy. Let's see if it's doable to a product-hoarder like me. Would you like to see that in a video? 

Thanks for stopping by.

Till next time,
Grace

Monday, May 20, 2013

Altered Quote Frame with tutorial

Happy Monday everyone. Since Monday has become my informal day of tutorials, I decided to share an altered frame project plus how to instructions with you today. 

The first thing I usually check when I'm in the craft store is the clearance aisle. It's the bargain hunter in me. Well, in one of my recent trips to my local Michael's craft store, I found some canvas frames that were on clearance for about $2. I picked one up thinking that the blank canvas can be prettied up with some of my scrapbook supplies. 

So I came home and a few days later created this....

I also wanted to play with new misting templates that I bought and some other "new" stuff in my stash. Projects like these gives me the freedom to just "play" and put items together that I've been collecting. 

Now here's how to create this frame...
First you'll need a canvas frame, pattern paper that will fit the inside of the frame, a quote, a die cut shape as your focal point, paint, paint brush, misting template and flower trim (optional)

Next you'll need to prep the frame for painting. I added a piece of scrap paper inside the frame to catch paint that accidentally gets inside the frame. 

Since my template is smaller than my frame, I started in one corner and worked my way around the project trying not to move my template too much. When I did have to move it, I tried to match it with what's already been painted so that the design will look uniformed all around. Once painted, set it aside to dry. 

Then I worked on the focal point of my frame. I cut out the compass die from Die Versions on a glittered cardstock. Since the glittered paper is thicker than the usual paper, make sure you run your die cut a few times through your die cut machine to make sure it cuts the piece from the paper. Mat the computer generated quote on black cardstock and trim. 

Then add the compass and quote on a piece of coordinating paper with foam adhesive. 

When the paint on the frame has fully dried, you can slip the focal point paper block. I decided to add some floral trim on the edge of the frame to create more attention to the center/focal point of the project. I added strips of adhesive to adhere the trim. 

And there you have it. Here's more detailed shots of my project...


Here's the supply list:
Frame- Michael's Craft Store
Papers- (glittered cardstock) Doodlebug Design; (white and black cardstock) WorldWin Papers; (red) Echo Park
Floral trim- Maya Road
Template- Prima
Compass Die- Die Versions
Paint- Plaid Enterprises
Adhesives- Glue Arts

Thanks for stopping by. So what about you? What is your favorite aisle to check at the craft store?

Till next time,
Grace

Friday, May 17, 2013

Layouts *Inspired By Stamping*

Woohoo! It's a Friday and I'm so looking forward to the weekend. I love how the weekend means family time and rejuvenation for me. How about you? 

As my last post of the week, I've decided to share a couple of layouts I made recently with the May release stamps of Inspired By Stamping. 

4 Exploring 
This page shows some pictures of a hiking trip my family and I took about two years ago. I saw the "4" paper block from a pattern paper and decided to use that as part of my title. The four represented the number of family members we have and then I added the word "exploring" to emphasize the type of activity this memory conveys for us. 

I used the script background stamp to create my own pattern paper flowers. I stamped them on solid paper and then punched out the flower shape. I curled the edges a bit to create dimension with them, punched out another flower to layer on top and then finished off the flowers with brads. 

I also added some washi tape stamps. They're one of my favorite stamps to date!

 Food Storage
In this page, I documented how important my food storage was to our family in this past year. I photographed my food storage after I accumulated a good amount of it (a couple of years ago) but decided to focus my journaling on how this supply has helped us during our "unemployment" challenge this year. It's interesting how sometimes you photograph something with a specific page in mind and then once ready to scrapbook, the story changes. Another reason why this craft is so exciting for me. 

I used one of the Big Hope stamp with the faith sentiment in this page. I also stamped the border background on white cardstock then used it as a strip of handmade pattern paper on the right edge of the page as well as butterflies on the left side of the layout. 

I misted some doilies and then added a circle frame stamp to give it some more design and texture. 

So there you have it. If you want to learn more about these stamps and other products that Inspired by Stamping, please click here

What are you planning on scrapbooking next? I hope these pages inspire you on your next project. 

till next time,
Grace