Everyone has a story to tell, here's mine sprinkled with some creative projects along the way.
Thank you for stopping by and I hope you come back again.


Tuesday, April 17, 2018

Our Happy Place layout *double page layout mini series*

Hello friends. Double page layouts have been my scrapbook "jam" since the beginning. I take lots of photos and trying to cram them into one page just doesn't seem right. So even though the trend moved away from 2-page layouts, I did not stop doing them. 

So to "catch up" on some family documenting, especially of our trips and adventures, I decided to put together a mini-series that is all about double page layouts. Here's my first page. 


Here's the process video...


This layout and the other ones that are part of this mini-series will include a certain formula inspired by the kits created by Scrapbook Generation. All my page kits include 3 pattern papers, 2 white cardstocks, and a sketch from Scrapbook Generation. 

Here are some more close-ups...


Wednesday, April 11, 2018

Unicorn Birthday Card Set *Cards in Envy Challenge Entry*

Hello friends. How has your "hump" day so far? It seems like I am on a roll on making cards. Are you enjoying these kinds of shares?

Anyways, today's cards were inspired by the latest challenge over at the Cards in Envy challenge blog. The theme was to "Create a card with the NEGATIVE space of a die or punch" 

And here's what I was able to create...
So I started off with a piece of white cardstock trimmed to about 1/4" smaller than an A2 card base. I then added some color to it by blending a few distress mini ink pads and applying it to the piece with a blending sponge tool. I used two pink and one orange hue for my background. then I even misted it with some clear glimmer mist for some shine. 

After that was dried, I cut out a circle from the center. For the first card, I used the negative piece and added it to a white card base. I had this unicorn stamp set from Hampton Arts and added some clouds and the castle image onto the card front then stamped the unicorn and sentiment on a separate piece of white cardstock. I colored the unicorn and cut out with a coordinating die set. 

I finished off the card with some clear sequins. 

 For the extra card, I didn't want to waste the positive part of the circle so I used that as the center of another card. This time, I used a rainbow embossing folder on another piece of white cardstock for the background. I liked the subtle design it provided. I also misted this with some clear shimmer so there's a bit of sparkle on it.

 So which card do you prefer, the one with the negative space or the more simple one using the positive circle?

Thank you for stopping by.

Till next time,
Grace

Tuesday, April 10, 2018

Birthday Present card set *Lawn Fawn Challenge Entry*

Hello friends. I have been busy making a bunch of cards lately. They are filling my need to be creative without spending as much time as I do when I make a scrapbook page. Plus since I've been repeating the same design to make multiple variations, I am filling my card stash pretty fast. 

Today I created a card based on the latest Lawn Fawn blog challenge. 

The gift box images are from the Bows and Holly stamp set. The sentiment is from the Scripty Sayings, and the papers are from the "Let's Polka in the Meadow" 6x6 pad. 

I had fun coloring in the gift boxes. I didn't' do any shading on these as I'm not that good at that yet. I did add some pearl pen dots to each present for a more festive look.

So there you have it. Thank you for stopping by and hope you come back again soon.

Till next time,
Grace

Monday, April 9, 2018

Floral Card Set *My Favorite Things Card Challenge*

Happy Monday friends. Today I'm sharing a card set that was inspired by the latest sketch challenge over at the MFT challenge blog
With this simple sketch, I was able to create 8 similar cards...
I started off with four cardstock pieces cut a tad smaller than an A2 card size then run them through my Cuttlebug with 4 different embossing folders. Next, I stamped some floral stamps (mine was super old) on white paper and then heat embossed them with white powder. Then I pulled out my distress mini ink cubes and did some resist color blending.  

After I did all of that, I cut each block into two pieces, cutting them into an angle. And since I have two pieces of each one, I was able to create 4 similar cards but have totally different looks to them. I finished off each card with a brown strip of cardstock, about 1/4" just to cover the seams where the two angled pieces of paper met. Plus I die cut some "hello" and "thanks" words from the Thanks and Hello die (MFT 906) die cut set from MFT. I die cut the words three times for the black ones making it really thick. I added some Nuvo drops to each card for some finishing touches. 

Here are a look at the cards in detail...


 Thank you for stopping by and I hope you have a crafty Monday.

Till next time,
Grace

Tuesday, March 27, 2018

"Our Cool Library" layout *Stuck Sketches blog entry*

Happy Tuesday my dear friends. Hope you are all well. I am still plugging away with my latest homemade scrapbook kit and my latest page was inspired by the most recent sketch over at the Stuck?! sketch blog....

And here's my take on the sketch....
Since I had more photos than the 2 squares within the sketch, I expanded my block to mostly the entire center of the page. I did add the banners to the left and right to stay true to the sketch. I moved my title and journaling to part of the larger block to fill up the space and complete my "grid". I had this negative space of the vellum piece (that I used in another page) and decided to add that here to frame my block/grid. 

Here are some more close ups...

I made my own bubble hexagon embellishments with pattern paper, tiny word stickers and some bubble stickers from Epiphany crafts.


I also added some homemade enamel dots in this layout. I am finding a new appreciation for my supplies that I can make my own embellishments from.

So there you have it. Thanks for stopping by.

Till next time,
Grace

Tuesday, March 20, 2018

"Thankful to Start A New Year" layout (The Scraproom Blog Challenge)

My latest page was inspired by the latest sketch from The ScrapRoom kit club blog

I created this using my latest homemade kit. I love the "springy" feel of this kit and the colors are just within my comfort zone. 

I used a die cut title and then smaller letter stickers to complete the full title.

This balloon was cut out from a Simple Stories paper. I love being able to use some paper images for my embellishment.

This color burst design is actually a rub on and it added some colors to this part of the page.

Thank you for stopping by.

Till next time,
Grace

"Just Awesome" layout (The Scraproom challenge)

I have been trying to find new creative ways to use my scraps of paper. And then I remembered the Scraproom kit club's Freaky Fast challenge. This one requires you to use a specific formula for cutting papers and use all of them for a page. 

I also used some cut files free from the Paper Issues blog.
I used products from my homemade scrapbook kit and I love the bright and fun colors of this kit. And because I could only use a certain number of papers, I pulled out some die cuts, washi tape and stickers to add some more details to the page. 

The cut file was cut with black cardstock which makes it stand out against all of the colors in this page.

The heart banner was a cut file as well. It was a left over from a previous page.

So that's it. Thank you for stopping by.

Till next time,
Grace

"Simply The Best" card (Reverse Confetti Sketch Challenge)

Sketches have been my favorite way to jumpstart my creativity. This one was from the latest Reverse Confetti stamp sketch challenge. 

Like I said in the previous post, I have started to make more than one card of the same design that I was making. It just makes sense since I have all of the products already on my table. 

With this card, I used the Here's The Story (RVC019) stamp set. This is one of my favorite sets for my scrapbook pages since it has a bunch of great phrases and words but it also works well for a masculine style card set. 

 I used the phrases and words to create my own background paper. I used the striped pattern paper as the inspiration for the colors of my ink. I liked the combo of the blues, greens and yellows.

I then heat embossed the sentiment "simply the best" with gold powder. I added some letter stickers to complete the card sentiment. I added some fun foam to the circle die cut to make it stand out against the busy background.

So that's it for me. Thank you for stopping by.

Till next time,
Grace

"Hello Friend" Card (Paper Smooches Card Challenge)

Hello friends. Today I'm sharing a card set that I made recently. I have found that I enjoy the process more if I make more than one card at a time. After all, I already have all of the products on my table and it just doesn't make sense to use up all of those products for just one card. It has been a win-win as I am using up more of my stash plus get a jumpstart in increasing my homemade card stash. 

For this particular card set, I was inspired by the latest Paper Smooches card sketch.....

Here's my take on the sketch...
I used the Friendly Flowers set for this one and a bunch of scraps. You can check out the rest of the Paper Smooches products here

I heat embossed the sentiment with black powder. As for the flower panel, I heat embossed the flower stamps with white powder and then added some color on the white cardstock with various distress inks. I matched the inks with the card bases.

And here are the four cards that I was able to make in one sitting...

So that is my card set today. Thank you for stopping by. Come back soon.

Till next time,
Grace

Friday, March 16, 2018

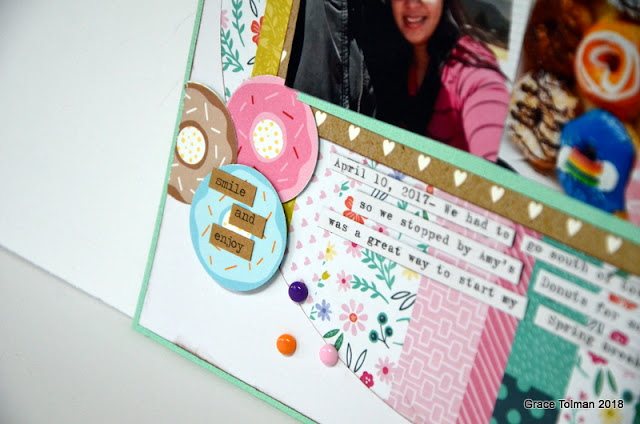
"A Sweet Date" layout

It has been a while but I have found myself looking at my favorite challenge blogs to ignite some inspiration and this page was created with a sketch from Stuck?! sketch blog. 

I used some items from my latest homemade kit. If you want to see what items I have chosen for my March/April homemade scrapbook kit you can view this video...


And here are some more close-ups from the above layout...


I had wanted to add some "donut" accents on this page to emphasize the theme and thankfully I had a scrap of paper that had a bunch of donuts on it and so I fuzzy cut them to add them here as embellishments. These are the times that I'm grateful for keeping scraps of papers.


 Thank you for stopping by and I hope you'll come back soon. I have a few layouts to share in the next few days.

Till next time,
Grace