Everyone has a story to tell, here's mine sprinkled with some creative projects along the way.
Thank you for stopping by and I hope you come back again.


Monday, September 24, 2018

"Hello Dental Chair" (The ScrapRoom Flavors of the Month kit club)

I can't believe September is almost over. Well if you are still looking for some inspiration from this month's The ScrapRoom FOTM kit, here's one from me using the Pretty Little Studio mini collection. 

Products used: Pretty Little Studio- Savannah Dreams + Embellishment Kit
Stash items usedDate Stamp; Black Ink pad; White Cardstock; Twine (American Crafts); Turquoise letter stickers (Studio Calico); Red Cardstock
Notes: This one used my scraps from the Pretty Little Studio collection. It’s so easy to put together a layout even if you are only using scraps if you follow the quart, pint, and gallon formula. Cut your papers into 3 varying sizes and then put them together on a white cardstock. This formula never fails me. 


I hope that this inspired you to create something today.

Till next time,
Grace

Friday, September 21, 2018

"conGRADulation Wishes" card (Glue Dots and Pink & Main Stamps blog hop)


Happy Friday dear friends. Today I'm participating in a blog hop brought to you by Glue dots and Pink & Main Stamps. I had fun working with the Pink & Main stamps and papers and adhering them with Glue dots adhesive makes for a fun, stress free cardmaking session. 


YOU ARE HERE>>>>Grace

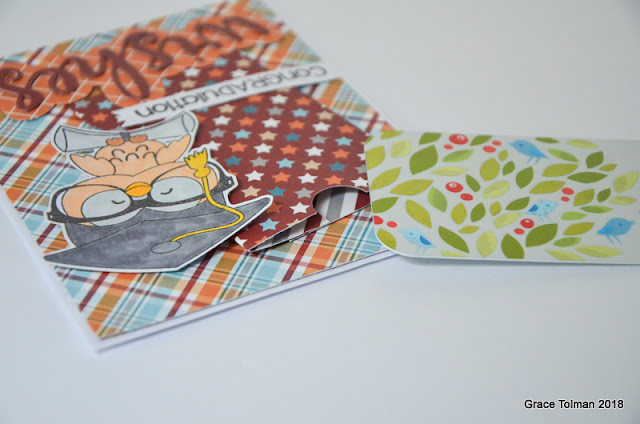
“ConGRADulation Wishes” card
Designed by: Grace Tolman
Time: About 30 minutes
Level: Intermediate
Size:  5 ½ x 4 ¼”
Notes: When I saw the cute owl image, I couldn’t resist. And adding some Glue Dots® adhesive enabled me to add some extra “gift” to this handmade card. 

Materials
Cardstock- (white) Core’dinations; (Maroon) Die Cuts With a View
Pattern papers- Take Flight, 6x6 pad, Pink & Main
Tools:
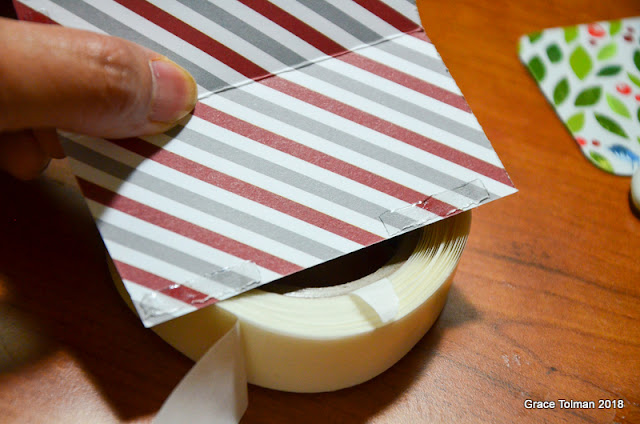
Glue Lines, Glue Dots®
Pop Up, Glue Dots®
Spray adhesive- Tacky Spray, Aleene’s
Ink- Black, Hybrid, My Favorite Things
Stamp- Grad Owl, Pink & Main
Die cuts- Wishes die, PNM086, Pink & Main
Manual die cut machine- CuttleBug, Provo Craft
Circle Punch- ½” Marvy Uchida
Markers- Spectrum Noir
Mist- Maya Road
Paper Trimmer
Scissors

Directions:
1. Cut the white 8 ½ x 11” in half lengthwise. Fold one piece into an A2 top folding size card.
2. Use the other piece to stamp the owl and the sentiment. Mask the “s” in the ConGRADulations sentiment before inking and stamping the sentiment onto the white cardstock. 

3. Color the owl with alcohol markers. Cut out the image leaving some of the white edge. Spray the image with the glimmer mist and set aside to dry. 


4. Measure your gift card and cut out a piece of pattern paper 1 ½” larger in width than the card. Using a bone folder fold the paper around the card. Punch out a half circle on the center of the pocket. Adhere the overlapping edge with some Glue Lines, Glue Dots® adhesive. 


5. Run the silhouette part of the “wishes” die cut through the Cuttlebug machine and a pattern paper. Cut the “wishes” word onto the maroon cardstock three times. 

6. Spray the back side of the 3 “wishes” cut out with tacky spray. Layer the cuts on top of each other to create the dimensional word. And adhere to the silhouette cut. 


7. Cut out a 4 x 5 ¼” piece of pattern paper and adhere to the card front using Glue Lines, Glue Dots® adhesive. 
8. Adhere the back side of the gift card pocket onto the card front at an angle using more Glue Lines, Glue Dots® adhesive. 
9. Adhere the “wishes” sentiment on the bottom part of the card with more Glue Lines, Glue Dots® adhesive. 
10. Add the sentiment strip onto the top part of the “wishes” layered paper with some Glue Lines, Glue Dots® adhesive. 
11. Adhere the owl image with a combination of the Glue Lines, Glue Dots® and Pop Up Glue Dots® adhesives. 
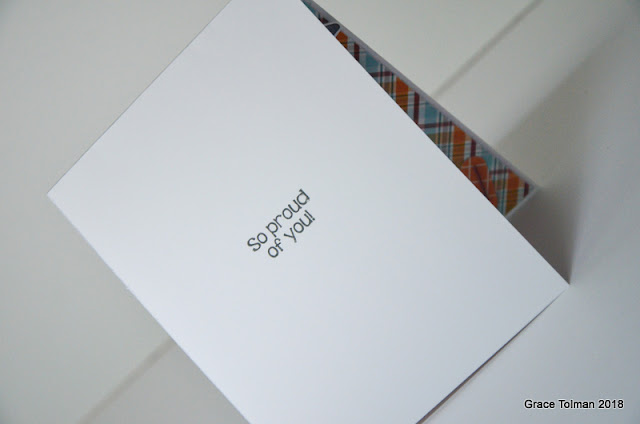
12. Stamp the “So proud of you!” sentiment onto the inside of the card. 


Thank you for stopping by.

Make sure you check out the links above to continue on through this blog hop.

Till next time,
Grace

Wednesday, September 19, 2018

"Dream Big Card Set" (The ScrapRoom Flavor of the Month kit club)

Here's an extra project that I was able to make with the latest The ScrapRoom Flavors of the Month kit contents....

Products used: Simple Stories Dream Big + Embellishment Kit
Stash items used: Blue, Gold and Light Pink Cardstock; Nuvo Glimmer Pen; Frame nestled die cuts (Inspired by Stamping)
Notes: I just love the die cut pack from the Simple Stories Dream big collection that was part of the Embellishment kit. They were so cute. I picked out three different large die images then corresponding “sentiment” blocks. I even added a secondary quote blocks for each card to add to the inside of the card. I added some shine to each die cut element with my Nuvo glimmer pen


 I even got to dress up the insides of the card. How fun is that?

Till next time,
Grace

Saturday, September 15, 2018

"Air Show" (September The ScrapRoom Flavors of the Month kit club)

Hello friends. I'm sharing my 4th project for this month's The ScrapRoom Flavor of the Month kit. 

Products used: Fancy Pants- Magnolia Lane
Stash items used: Date Stamp; Black Ink pad; White Cardstock; Thickers- American Crafts; Spectrum Noir Marker; Circle cutter (Creative Memories); Pearls; Butterfly Punch
Notes: This collection has a lot of beautiful papers. However, I found it hard to match with my printed photos. So to overcome that challenge, I went with the brick pattern paper as my background. That was a good “neutral” base for my photos. Then, to incorporate the other pattern papers, I added them as circles. I also used the “Our Story” paper that had 4 wide strips of different patterns on one side to punch out my butterflies. I love how these kinds of papers offer a variety from one single sheet of paper.  

Here's the process video that goes with this layout:


 Do you like these kinds of papers or do you gravitate to more colors?

Till next time,
Grace

Thursday, September 6, 2018

"Dream, Sparkle, & Shine" (September The ScrapRoom Flavor of the Month kit(

There are a few things that makes me happy than a cute girly collection that fits perfectly with my sweet girl. This Simple Stories one that is part of the Flavors of the Month kit from The ScrapRoom. 

Products used: Simple Stories- Dream Big
Stash items used: Date Stamp; Black Ink pad; White Cardstock; Circle cutter (Creative Memories)
Notes: I am in a big circle kick lately so this one had two big circles on it. I wanted to add some of the images on the 4x4 elements paper but to spice things up I cut them out as circles. I layered them with some more pattern paper for more color. I also added the striped side of the 4x4 elements paper all around my pink cardstock to create a frame around my photos and story. I love how it grounded the page. 

Here's my process video:


Hope you have a great crafty day.

Till next time,
Grace

Monday, September 3, 2018

"Blessed Family Excursion" (September The ScrapRoom kit club Flavors of the Month)

Hello Monday. Today is another The ScrapRoom kit club FOTM September share. And it is a double page layout. 
Products used: Crate Paper Willow Lane
Stash items used: Date Stamp; Black Ink pad; White Cardstock; Scallop border punch (Fiskars); Gold Letter stickers (American Crafts); “Blessed” cut title from white cardstock
Notes: I loved the dainty colors of this collection. Since I was only working with three pattern papers and my goal was to scrapbook a double page layout, I did some creative cutting and piecing together with my papers to add pattern to my otherwise plain background. I also loved the butterflies in the “flutter” paper so I fuzzy cut them and added them as accents on my page. 

And here's the process video to go along this post...


Thank you for stopping by.

Till next time,
Grace

Sunday, September 2, 2018

"Enjoying This Stage" (September The ScrapRoom Flavors of the Month Kit)

Happy Sunday dear friends. Today I'm coming to you with my first project for The ScrapRoom for the month of September. It is also my take on this month's sketch. 


Products used: Pretty Little Studio- Savannah Dreams
Stash items used: Date Stamp; Black Ink pad; White Cardstock; My Mind’s Eye letter stickers; Twine, American Crafts; Circle Cutter, Creative Memories
Notes: This one was created with the latest TSR sketch in mind. The sketch called for 2 4x6 photos but I swapped it with a single 5x7 vertical photo. I added some circles cut out from pattern paper like the one on the sketch. I did have to add some twine from my own stash so I can incorporate the thread element in the sketch. I had trimmed the “enjoying” in my title from one of the pattern papers. 

And here's the video of the process:


Thank you for stopping by and make sure you check out the TSR website for more information and inspiration.

Till next time,
Grace