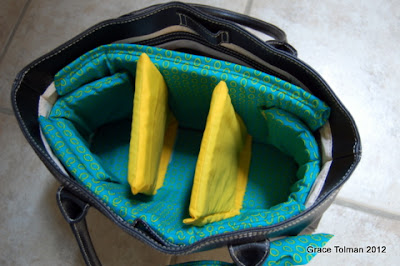
Happy hump day everyone. So I've been eyeing this great camera bag for a while but with the hefty price tag I knew that I would be dreaming for a while if I have my heart set out to get this. So because I'm very impatient, I decided to make my own camera bag/purse. With the help of Pinterest and tutorial 1 and tutorial 2, I finally got my own camera bag made. Look on to see my process...
I started off with a bag purchased at the thrift store for $8. I love that the handle looks strong and the shape of the bag is sturdy and structured. Everything that is essential to hold heavy (and expensive) equipment. I used some fabric that I already had on hand and it just so happen I had leftovers of the ones I used for my camera strap so I got that to match with my bag liner :)
So my process was similar to this tutorial and this one too. If I happen to not cover everything in my steps below, make sure you check out the links I provided to give you a better idea on how to recreate this project.
So first you need to have your bag/purse; foam (the tutorial used a 1" thick foam but because the opening of my bag seemed a bit narrow and my camera is quite large, I opted for 1/2") fabric (over a 1 yard) and velcro. Plus thread to match your fabric and basic sewing notions like tape measure, chalk or pencil and pins.
I measured the inside of my bag next. I measured the bottom portion (width and lenght) and the sides.
then I cut out my foam to match the measurements that I just made.
Next I placed the foam on top of two pieces of fabric, giving 1/2" space between the pieces and 1 1/2" all around. Cut the fabric out.
Then I measured my foam insert dividers, cut out the foam and then the fabric. The tutorial said to sew the 3 edges of the fabrics which I followed BUT if I were to do it again, I would sew on the velcro to one side/part of the fabric first before I sew the fabric sides together because I had a difficult time adding the velcro later on.
So after I've sewn the three sides of my fabrics, I laid my velcro where I'm going to sew them. I found that pinning was difficult to do without pinning the bottom portion of the fabric so I used some glue dot in the middle of each velcro to hold them in place. I placed them in the middle since I'm sewing the sides of the velcro to the fabric.
When I've sewn in all of the velcro to the corresponding fabrics, I sewn shut the panels/blocks.
I had a little bit of fabric left so I sewn a strip and tied it to my bag handle. I'm thinking I'll make an I.D tag later on.
So that's it. Instead of purchasing a $300 camera bag, I made my own for about $25.
Thanks for stopping by.
Till next time,
Grace


No comments:
Post a Comment