It's Friday and I'm soooo looking forward to ending this week. Loaded has been an understated theme for me this whole week and I'm looking forward to a better, less loaded couple of weeks. I'm crossing my fingers that would be the case anyways.
Anywhooo, today I want to share with you a quick and easy project that you can add to your Christmas decor this year, or get it ready for next year's Holiday :)
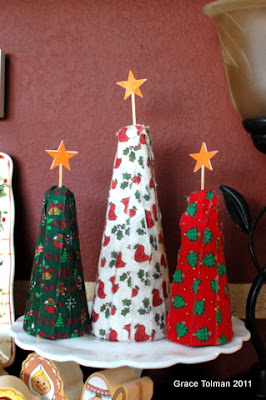
Fabric Christmas Trees
I am inlove with milk glass containers and I scored this cake stand a few weeks ago while on a antique shopping day with some girlfriends. I knew I wanted to display it for the Holidays but didn't have anything "fun" to add to the pedestal so the lightbulb went off my head and that's how these fabric trees came to life. Know it sits on my lovely cake pedestal and finished off this collage of decorations I placed in my living room.
With this project, I was also able to make use of some Holiday fabric that has been sitting in my collection for over 4 years now (yes I''m a bit embarrased by how long they've been in storage)
So, wanna make your own? Here's my process for this project...
Supplies:
Styrofoam cones in different sizes (I used two in the same height and one taller)
Holiday themed fabrics ( you don't need a lot so if you have scraps better but if you have to get out and buy it, I'd say no more than 1/4 of a yard for each one)
Fabric Scissors
Glue Gun
Toothpick or small sticks
Star punch (optional)
Glittered paper
1. Tear your fabrics into strips. I measured (well mostly eyeballed) the length of my cone vertically then added about 1/2" more on both ends so the fabric can co over and under the top and bottom parts of the cone. When tearing your fabric, use the scissors to cut a small slit and then rip, it's easier that way. Why rip? it gives the edges a more homespun look. You don't have to do it this way. Another variation...use pinking shears to cut the long edges of your fabric strips.
2. Then you add each strip to the cone with a glue gun. Overlap the fabrics onto each other so you can fully cover the white styrofoam. Repeat #1 and 2 for all cones.
3. Then punch out stars from glittered cardstock (if you don't have a star punch or would want to make it look more homemade you can also handcut the star). Make two stars for each cone and sandwich a stick or toothpick between the stars with some hot glue.
4. Finally hot glue the stars to the top of your styrofoam. Initially I was going to just poke the stick through but with the thickness of my fabric and hot glue on the top, it was impossible (for me anyways) to get the stick through all the way to the styrofoam.
and voila! you have made a fantastic and yet easy decor for your home this Holiday season.
A few more tips....
-because I rarely pay full price for anything, it took me a couple of visits to the craft store to purchase my styrofoam so I can use my 40% coupons on both purchases. Make sure you have a running list of craft supply to purchase and buy them with coupons or when they're on sale so that your crafting is easier on the back account.
-for the fabrics....you can also visit your local thrift stores and repurpose shirts, sheets or any fabric typed item you can see there to use for this project.
-You can make a lot of these cones and spread them around your home. I'm sure you can even translate the technique onto stryfoam balls or squares. The possibilities are endless.
So there you have it. I hope you enjoyed our tutorial post today.
Have a great weekend.
Till next time,
Grace


No comments:
Post a Comment