Everyone has a story to tell, here's mine sprinkled with some creative projects along the way.
Thank you for stopping by and I hope you come back again.


Friday, June 29, 2012

What a week + Cabbage Kielbasa Skillet

Hello guys. Whew! What a week we've had around here. Today I wrap up a fun Craft Camp with 17 kiddos plus kept one eye and ear glued to the front window making sure that the Waldo Canyon Fire is not coming towards our neighborhood. If you haven't heard...Colorado Springs was hit with it's worst fire in history. It was surreal seeing houses burn right before my eyes on Tuesday night (June 26th.) The fire was blazing fast and hard due to the dry conditions and strong winds. Thankfully our part of the city (east of the freeway) was spared but oh I feel so bad for all those people that had to be evacuated and lost homes. It's such a tragedy. But the good thing (and there's a good side to every tragic story) this community really stepped up and lend help to those in need. I even made my camp kids make Thank you cards for our beloved firefighters. Everyone helped in all the ways they can and it makes me feel so proud to live in an area where we have good hearted people all around.

Ok so we are back to blogging. Woohoo! I missed this place and being able to share with all of you my projects, thoughts, ideas and words. Next week we will be back to our "regular programming" but before I bid you a happy weekend, how about a food share...


Cabbage Kielbasa Skillet
Prep/total time- 25 min.
Serves 4

1 large red onion, sliced
1 large green pepper, julienned
1 large sweet red pepper, julienned
2 tbsp. butter
1 pound smoked kielbasa or polish sausage, cut into 1-inch slices
1 package (16 oz.) coleslaw mix
½ cup reduced sodium chicken broth
1 tsp. garlic powder
½ tsp. pepper

In a large skillet, sauté onion and peppers in butter until tender. Add remaining ingredients. Cook and stir for 6-8 minutes or until heated through.

This recipe was taken from "Taste of Home, Fresh and Easy" cookbook. Taste of Home cookbooks are, by far, my favorite ones. The recipes in it are gathered from regular cooks like me and the ingredients are not hard to find. Plus they have a picture of the finished dish for almost all of the recipes. Like I said before, I'm a visual person and so seeing what the dish should look like when I'm done cooking it, helps me decide if it's enticing enough to make.

My comments on this dish...
1. I like it alot, especially for Summer days when it's too hot to turn on the oven but I don't really want to grill anything.
2. This dish has meat and LOTS  of veggies which pleases both me and my family. My love ones are meat eaters and I'm trying to be healthier in my food choices so this is a win-win dish for us. Plus you can't beat the color! So pretty.
3. It's also very inexpensive. The most expensive ingredient would have to be the kielbasa sausage which, if you get it on sale would only be around $2.50-$3.00 a pound. I've also seen Turkey kielbasa at the store which can cut the fat off more for those serious dieters. :)
4. Because this dish is heavy laden with veggies, I just pair it with homemade biscuits or rolls and a slice of fruit. Summer combined in one dish...don't you think?

Have a great weekend everyone.

Till next time,
Grace

Monday, June 25, 2012

Random Monday

Hi all. Today's going to be quite the random post bec. there's just so many things to say and little time to do so. So here it goes...

June has been a challenge-filled month over at Paper Bakery kit. We presented you with challenges every single Monday and I hope you played along with us. For our last challenge, we want you to use circles in your projects/layouts. The layout above is a reposting of a layout I made recently that shows how I used circles in my layout. Check out the challenge and all it's details here.

I will not be posting anything until Friday because I will be busy with my first every Summer Kid Craft Camp. SUPER EXCITED about this. My head is spinning with details and so blogging will be put on hold. I'll come back to sharing come Friday with a food Friday post. Make sure you come back for that.

and finally....please pray for the over 11,000 people displaced by a fire near us here in the Springs. This photo was taken on Saturday morning and the last I heard, it has spread big time and 2 more fires have started. It's making me really angry that people are starting these fires. What on earth can they gain from this??? I really don't know and it's making me sad knowing that the beautiful mountains that I see everyday are not going to be the same ever again. :( :( :(

Side note: We are safe. The fire is on the other side of the freeway and there's many more houses between us and the fire. Thank God for that.

So that's it. Have a great day.

Till next time,
Grace

Friday, June 22, 2012

Huevos Rancheros Verdes

Oh Friday, how I long for thee!!! It's Friday and I'm going to party! Not really but the thought of the weekend approaching is making me feel very excited and happy. This week was super-crazy-busy but I can't trade it for anything else. *wink*

So for our Friday recipe share I decided to go with this South American type dish...

Huevos Rancherso Verdes

I'm sorry but I forgot the name of the cookbook I got this from. But here's the recipe....

Huevos Rancheros Verdes
Active time: 30 mins. Total time- 30 mins.
4 Servings
1 ½ cups very thinly sliced romaine lettuce
1 scallion, sliced
2 tbsp. Chopped fresh cilantro
3 tsp. canola oil, divided
2 tsp. lime juice
 ¼ tsp. salt, divided
¼ tsp. freshly ground black pepper, divided
 1 15 oz. pinto beans or 1/1/12 cups cooked
 ¼ cup prepared green salsa
8 -6inch corn tortillas
Canola oil cooking spray
 ¾ cup shredded sharp cheddar cheese
 4 large eggs.
1.       Preheat oven to 400 degrees. F.
2.       Combine lettuce, scallion, cilantro, 1 tsp. oil, lime juice. 1/8 tsp. salt and 1/8 tsp. pepper in a bowl; set aside. Combine beans and salsa in another bowl.
3.       Coat both sides of each tortilla with cooking spray. Place tortillas on a large baking sheet in 4 sets of overlapping pairs (Each pair should overlap by about 3 inches).  Spread about 1/3 cup of the bean mixture on top of each pair of tortillas and sprinkle with 3 tbsp. cheese each. Bake until the beans are hot and the cheese is melted, about 10 mins.
4.       Meanwhile, heat the remaining 2 tsp. oil in a large nonstick skillet over medium heat. Crack each egg into a small bowl and slip them one at a time into the pan, taking care not to break the yolks. Season the eggs with the remaining 1/8 tsp salt and pepper. Reduce heat to medium-low and cook undisturbed for 5-7 mins. for soft-set yolks. (for hard-set yolks,  cover the pan after 5 minutes and continue cooking until the yolks are cooked through, 4-6 minutes more)
5.       To assemble, place an egg on top of each pair of tortillas and top with a generous ¼ cup of the lettuce mixture.

My comments...
1. Four of these doesn't cut it for my family so I actually double the recipe and most of my family prefer hard-set yolks so it takes me a bit longer to cook the eggs. So if you are planning on making this and you are doubling the recipe and/or like your eggs with hard-set yolks, plan to be cooking close to 45 minutes intead of the 30 min. mentioned in the recipe.
2. This is a great non-meat dish. Great for those nights where you want something light or when there's a great deal for eggs like what we just had this past week at our local Albertson's. It's also very easy on the pocketbook bec. most of the items in this dish can be purchased at or lower than $1 when they're on sale, and if you have a garden going, the lettuce, scallion and cilantro could be free. :)
3. I LOVE this dish! full of flavor especially with the lettuce mixture. The scallions, cilantro and lime gives the mixture a boost of freshness that perks me up all the time.
4. I add some more of the green salsa and some hot sauce (Tapatio) as a final topping before I bite into this dish. I love it spicier.
5. Because I was doubling the recipe and only had one can of pinto beans on hand, I added a can of black beans instead. I didn't see any difference in flavor by mixing it up.

So that's it. Hope you try this recipe soon.

Till next time,
Grace

Thursday, June 21, 2012

Maddie got a new dress

Hi all!

So about three weeks ago while walking through the aisles of my local Walmart, I was stopped in my tracks by a huge rack of fabrics ON SALE. I'm not very good at sewing BUT I have noticed that fabrics and papers are one and the same. They have an array of designs, colors and textures that I just can't turn away from.

So my 1/2 hour Walmart trip turned into an hour cause I had to browse through the many fabric choices and get my choices cut. One of the prints I chose was a blue checkered design that I thougth would be a great foundation for a dress for Maddie to wear for Fourth of July.

So after a week of the fabric sitting on my craft table, I finally got to work on it and here's the result...

Like I said, I'm not a good seamstress compare to the other ladies in my family (Grandma, Mom and Sister) but I love the idea that with whatever sewing knowledge I have, I can 'MAKE' something for my little one that's unique and pretty.


I'm still afraid to tackle sleeves so I went with a sleeveless dress here and luckily Maddie had a white polo shirt that fit underneath the dress.


I found these felt flowers in my scrapbook stash and it just so happened that it matched the color of the dress so I whipped up a quick floral headband for her as well.


I didn't want to mess with zippers here so I went with a tie band in the back.


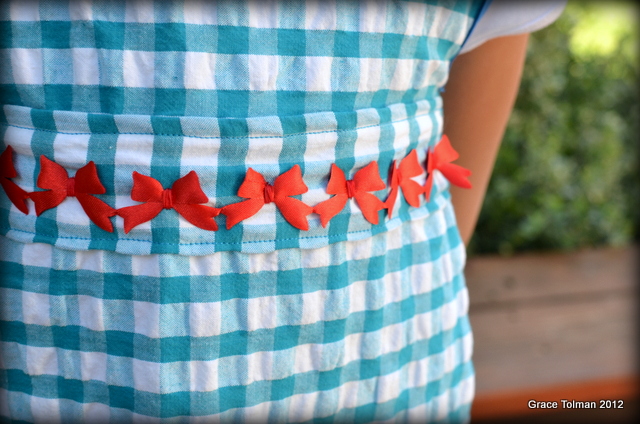
and finally to add an accent of red in this dress, I added a ribbon trim (again found in my scrapbook stash) which I handsewn on the dress.

She looked really pretty when she wore this for the first time to church.

and there you have it. My latest sewing adventure.

Till next time,
Grace

Wednesday, June 20, 2012

Layouts lately

It is midweek. How is yours turning out? As for me, I'm a bit busy this week getting all the details ironed out for a Kid's Craft Camp I'm holding next week. I'm excited to share my love for crafting to some young friends. I'll update you on it next week.

today I want to share some layouts I did recently. Lately I've been feeling the urge to "get caught up" and been whipping layouts more than I've done in the past months. I love these short but productive urges. They get me to accomplish just enough so that I won't be too overwhelmed for the next couple of months. aaahhh, the beauty of memory preservation! There's no right or wrong way to do it and you create at your own pace. I love my job!!! 

10 years
About three weeks ago, I participated in a sketch challenge at the 2peas website and I made this. The fun part...I won the challenge and got a gift certificate to the store. Woohooo!
I used the 10 squares on the left to encompass what each year represents in the past 10 years of me and hubby's marriage. I had a blast making this page and incorporating so many products to create my "yearly" boxes.

 Cabrillo Beach
PULLED OUT FOR PUBLICATION
this page was made with the Paper Bakery June Add On Kit. I also made with for the latest challenge we are doing at the blog, it is to make your own handmade embellishment. I have a tutorial for it and you can see it here.

 My Son
This one was made just for me. Love those kinds of projects. :)
Anyways, I had some This &That papers from Echo park that's been sitting on my table for over a month now and I had been wanting to find the perfect theme/project to use them with and these photos of my son (from three years ago) wearing his uncle's fedora hat was the perfect ones to use it with.

I love the vintage-y feel of the papers and with a combo of b&w and colored photos, it blended really well.

So that's it for me today. I hope these layouts inspired you to preserve some of those special memories for you family today in a scrapbook page.

Till next time,
Grace

Tuesday, June 19, 2012

Take Twelve, June Edition

Happy Tuesday everyone. I hope you've enjoyed the My Little Shoebox and Twinery blog hop yesterday. Wasn't there a plethora of awesome projects? It's going all week so make sure you stop by the Twinery and My Little Shoebox blogs to see who's hoppin' today. :)

For today's post, I'd like to share with you my Take Twelve photos for this month. I can't believe we are halfway through the year. I have to tell you that I'm super excited with the photos I've captured so far for this challenge. I think Take Twelve is such a great project to get your feet wet with capturing your year and the everyday memories.

Here's my June edition...

1. Time that I finally remembered to pull out my camera and start my Take Twelve challenge.
2. My kids are loving this cereal right now. There's no need to "force" them to eat when this is what's in their bowl.
3. Checking my facebook is one of my morning routine. Social media is both a blessing and a curse in my life.
4. Since Marcus is in Scout camp, I took Maddie to the outdoor mall to play in the water fountain. The water was still a bit cold but she enjoyed the whole 20 minutes that she was playing in it.
5. Reading "Raising Boys with ADHD" book while Maddie played in the water. Very informative and glad that our library had it so I didn't have to go out and purchase it.
6. Stopped by Jo-Ann's craft store to return some foam brushes. I got a better deal at Michael's.
7. Driving home and snapped this photo of Pike's Peak. Moments and views like these makes me feel so blessed to live in the Springs.
8. After lunch, I started dinner- seasoned chicken in the crockpot. Yummy!
9. Picked up my son from his first day at Scout camp. He was exhausted but was full of stories to tell.
10. Maddie and our neighbor friend enjoying some time in the trampoline.
11. Had to do a load of laundry tonight since Marcus needs to wear his camp shirt again tomorrow.
12. Enjoying some "me" time after the kids have gone to bed, watching "Felicity" on Netflix and knitting.

To learn more about the Take Twelve Challenge, please click here.

Till next time,
Grace

Monday, June 18, 2012

My Little Shoebox and Twinery Blog Hop


Hi there and welcome to the My Little Shoebox and The Twinery blog hop!!! We've teamed up this week to bring you lots of inspiration and prizes!

Here's my share for the hop....

Curly Stytle


In this page I combined the Happy go lucky papers with a few Twinery twines. I used the twines as a stitching accent, I wrapped my chipboard letters for the title with colorful twine and I also wrapped the twine around my punched scallop flower to create more dimension and texture for it.


Supplies Used:

Cardstock- WorldWin
Pattern papers-(Life is sweet, 11860; Cricket and lagoon, 11858; Ride Along, 11854; Happy Go Lucky collection kit, 11850) Happy go lucky collection
Letter stickers- Glitter Alphabet sticker, Black Diamond, 10113
Chipboard letters- Maya Road
Flowers- Accent Creative Designs
Rhinestone- Doodlebug Design Inc.
Twine- Denim, Carribean, Mandarin, Lilac, Pink Sorbet, Lemondrop, Cappucino- Twinery
Flower punch- Creative Memories
Black pen- Creative Memories
Adhesives- Glue Arts


So you don't miss a chance to comment on each blog to be entered to win our fantastic prizes, here's the hop order and links you need to follow 


Monday, June 18

The Twinery
Grace Tolman-----YOU ARE HERE!
Kathy Skou


Now head on over to Kathy Skou's blog to see what they have to share today.

Happy Hoppin'

Till next time,
Grace

Friday, June 15, 2012

Sautéed Pineapple and Bananas with Honey

It's Friday again and I'm here to share with you a recipe I recently tried out. I figured I shared two dinner recipes already so this time, we are doing a dessert...

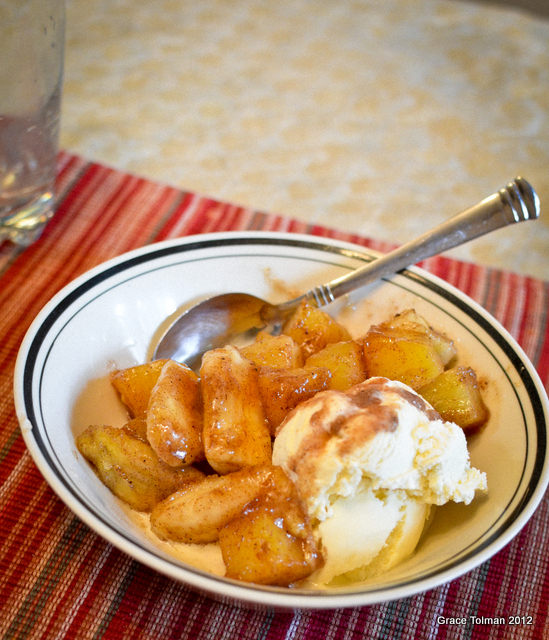
Sautéed Pineapple and Bananas with Honey
“Home Cooking”, The Costco Way cookbook
Makes 8 servings.

Vanilla low-fat frozen yogurt
¼ cup butter (1/2 stick)
¼ cup honey
1 tsp. vanilla extract
1 tsp. ground cinnamon
4 cups fresh cut pineapple chunks
2 bananas, cut in half lengthwise and then cut into quarters

Spoon frozen yogurt into individual serving bowls and keep in the freezer until the fruit mixture is ready.
Melt butter in a large sauce pan over medium heat. Mix in honey, vanilla and cinnamon. Add pineapple and simmer for 2 minutes, stirring occasionally. Add bananas and stir until evenly coated and bananas are cooked through and soft. Serve immediately over  frozen yogurt.

As you can read, I got this from one of my Costco cookbooks. I love those books especially since they give you recipes that help you figure out how to use up the many products we get at Costco. We all know that sometimes eating plain bananas can be boring. :)
So my comments on this recipe is..
1. Nowadays, I go with recipes I have the ingredients on hand already and if I don't have that specific one, I'll have something to substitute it with. For this recipe, I substituted the fresh pineapples with canned ones. I'm sure the fresh one tastes better BUT again I wanted to use what I have and the DelMonte canned ones in my pantry didn't have the sugary syrup with it so I went with that. I also had vanilla ice cream already on hand so I substituted that with the yogurt.
2. This recipe is so delish. Simple yet very delightful. A perfect Summer dessert! The syrup tastes very similar to caramel sauce and so when you combine the sauce with the ice cream, it becomes a soft divine taste in your mouth.
3. I was surprised at how the sauce matched more with the pineapple than the bananas. For some reason, I thought it would be the other way around since the pineapple was already sweet but the honey/butter syrup went well with it. Learned something new!
4. The family LOVED it and we made plenty to eat on another night.

So there you have it. Hope you have a great weekend and if you are wanting a dessert that brings out the best of the season, why not try this one. :)

Till next time,
Grace

Thursday, June 14, 2012

Home of the Braves Wreath + Tutorial

Wreaths were one of my recent obsessions. I even made a board on Pinterest dedicated to all the cute wreaths I can make, you can see them here.

For the upcoming holidays I went with the traditional red, white and blue color scheme and found some papers from the Liberty line of BoBunny that perfectly conveyed the patriotic theme.


And here's how I made it...

Supplies:
Styrofoam wreath in desired size
Pattern papers and stickers
Ribbon (enough to cover the styrofoam)
Buttons
Twine
Rhinestones
Glitter Glue

Tools:
Scoring pad/board
Circle punch
Foam adhesive
Glue Gun and Glue sticks

1. First I wrapped the foam with ribbon. You might be thinking that since I'm using white ribbon, I should've just left the foam along BUT I like the finished look the white ribbon gives to the wreath.

2. Then I made paper rosettes from the pattern paper. You can see this old post for a tutorial on paper rosettes.

3. Then I laid the rosettes on the wreath, adhere them with glue gun and then added some stickers. I added these with foam adhesive AND glue gun. The foam "lifts" the paper up and the hot glue ensures that it sticks well to the wreath.

4. I decided to add some "sparkle" to my wreath, so I added dots of glitter glue around my stickers.

5. I then added buttons threaded with twine on some of the rosettes...

6. ....and bling on others

so there you have it. Quick and pretty. Here's some close ups...


Hope you enjoyed my tutorial today. Happy crafting everyone.

Till next time,
Grace

Wednesday, June 13, 2012

Focus on the Family field trip *lots of photos*

On May 29th, right after Memorial day and as soon as the kids were "officially" on Summer vacation, we went to Focus on the Family visitor's center. We've been living in the Springs for almost two years now and I've felt a bit embarassed that we have not ventured here before. And the fact that it's a free activity makes it even more appealing. Mitch couldn't come with us but after the fun that the kids had, I'm sure we'll come back to this place again. Here are some of the pictures from our visit there...

The Welcome Center boasts of many displays, a bookstore and a basement level devoted a play area just for the kids.

We walked in a room that was specifically decorated with C.S Lewis' Narnia book. It had a big wardrobe in there that when you open leads to a small room depicting the scene/story of "The Lion, Witch and The Wardrobe" book. So fun!


They had some computer screens where the kids can touch the screen and color the images. They also had a replica of an airplane where the kids can go in and out of.

Love this humungous couch. No worries about space if we had such a big chair in our home. See how tiny the kids are compare to the couch? I even got Maddie to take a photo of me on the couch.

One of their big 'attraction' here was the three-story spiral slide. The kids both were big enough to get on it. I of course stood on the side lines and took pictures.


 I was surprised that the time that we went there wasn't that packed. The kids got the "little theater" all to themselves. The stage was so cute and the kids got to see themselves on the screem behind the audience chairs.


 They even had a little room you can watch Veggie tale videos.

 and the kids got to sign a larger than life birthday card. Very cute!

 and here's the kiddos with the Pike's Peak in the background...
so that was a summary of our first official "summer" outing.

Happy Wednesday.

Till next time,
Grace