Everyone has a story to tell, here's mine sprinkled with some creative projects along the way.
Thank you for stopping by and I hope you come back again.


Showing posts with label cameo. Show all posts

Monday, August 8, 2016

"Christmas Lights" layout

Hello my dear friends and happy Monday. I'm back with a few layout shares. The first one was based off of the following sketch from My Creative Sketches blog

I love the center design but I didn't have just three vertical photos so I squeezed in my 6 3x4 photos instead. I love the circular background element too and I had this die cut created with the Silhouette Cameo and placed that to draw the attention towards the center. I also love how the white color of the design is a great way to break the dark colors of this page (photo and red background paper) 

Here are some more close ups....


 Thank you so much for stopping by.

Till next time,
Grace

Monday, January 20, 2014

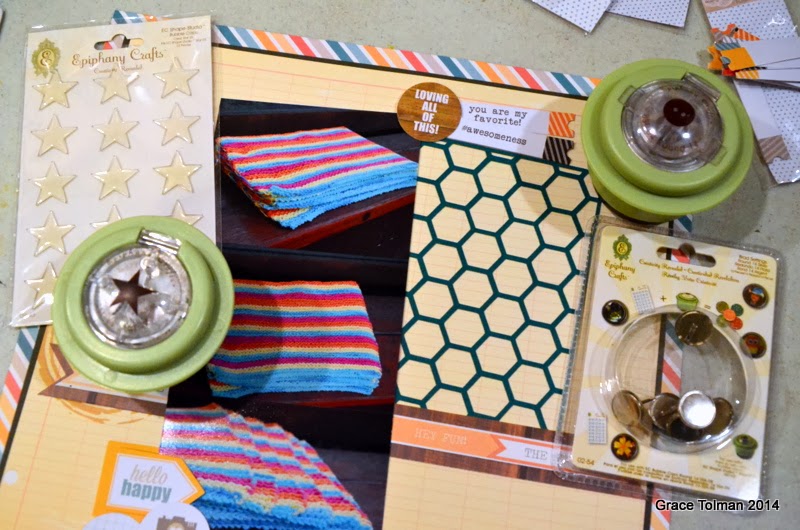
Handmade layout *Epiphany Crafts and Chic Tags*

Hi there friends. Today I’m sharing what I did with the fun products from Chic tags alongside some of my “go to” accents from Epiphany Crafts.

Instructions:

1. Build your page by layering Chic Tags papers and cardstock. Create the honeycomb paper from the die cut machine. 

2. Once papers and photos are adhered, you can start adding accents and embellishments. Create some handmade brads and bubble stickers using the Epiphany Crafts tools and bubble stickers. Thread some twine to the buttons you’ve created with the EC tool and stickers for a finished look. 

3. You can even use the packaging as part of your accent like what I did here as I created a round bubble sticker with one of the tag packaging. 

4. Another way you can personalize your bubble sticker is to transfer them on white cardstock and then punch out the accent with the Round 14 tool and adding bubble sticker with it. 

5. Add a vellum piece behind the title to make it stand out better against the busy honeycomb paper.
6. Handwrite your journaling.

7. Add rubon arrows on the top left corner and adhere all elements using dot and foam adhesives. 

here's another look at the finished layout....


Supplies Used:
Epiphany Crafts Shape Studio Tool Round 14 SST-02
Epiphany Crafts Shape Studio Accessories Bubble Caps Round 14 SSA-08
Epiphany Crafts Button Studio Accessories Buttons Round 14 BSA-10
Epiphany Crafts Shape Studio Accessories Bubble Caps Star 25 SSA-43
Epiphany Crafts Shape Studio Tool Star 25 SST-41
Epiphany Crafts Brad maker
Cardstock- WorldWin Papers
Pattern papers, rubons and die cuts- Chic Tags
Letter stickers- Thickers, American Crafts
Vellum- WorldWin Papers
Pen- Millenium, Zig
Die cut machine- Cameo, Silhouette
Twine- The Twinery
Adhesives- Thermoweb, Xyron, SEI

Make sure to stop by the Epiphany Crafts blog for more inspiring projects with Chic Tags.

Till next time,
Grace

Wednesday, December 18, 2013

New Christmas decorations with the Silhouette Cameo

Every year I try to add something handmade to my growing collection of Christmas decorations. This year I decided to use my Silhouette Cameo to make some fun items with vinyl and masking techniques. 

Joy Pillowcase
One of my favorite things to do when I'm at Hobby Lobby is to check the remnant or scrap rolls of fabric. It's usually at the back of the store. Because these fabric pieces are not enough to complete a yard, they're usually at a discounted price. Anyways, this year, I was able to score some plain canvas fabrics. I love the thick and durable texture of these pieces. I decided to make them into pillowcases.
For this first one, I got this image from the Silhouette store, cut it out on a vinyl sheet and placed the negative parts of the cut on my fabric. I didn't want this to look so "Christmas-y" so I used a pink paint.
*For my acrylic paints, I add a fabric medium to them so that they can be used for fabrics and that paint doesn't come off when I wash the pillowcase.


Merry Christmas pillow case
This one used a similar technique, cutting the image on vinyl from the Silhouette Cameo and painting the inside parts of the cut. I used green as my paint and used red buttons to add dimension and design to my tree. I gotta tell you though, that the vinyl is pretty tricky to work with. It takes a lot of patience to transfer the image onto the pillow without ripping the vinyl or getting it stuck together. It was definitely a challenge!


Joy Plate
So I didn't let my vinyl cuts go to waste. If you remember my first pillow, I used the positive cuts of that image and transferred it onto a plate. I got this plate at Goodwill for less than $3. I actually had this for about a year now and was just waiting for the right image to add to it. This "joy" ornament cut was super cute and I couldn't resist. The beauty about vinyl is that when I'm tired of this image, I can simply peel off the image and I have a fresh new plain plate to dress up.

So there you have it. Thanks for stopping by and I hope you get to create something fun and festive for your home this Holiday season.

Till next time,
Grace