Everyone has a story to tell, here's mine sprinkled with some creative projects along the way.
Thank you for stopping by and I hope you come back again.


Wednesday, June 8, 2011

Summer Days

I'm not going to complain that we had totally skipped Spring around here and just went straight to summer. Having the sun shining and being able to wear flip flops again doesn't give me much reason to complain. So with that, today I decided to share some fun "summer" themed projects.

I have started a bit of a collection of paper pads. I love how I can get all the papers in one collection in a tiny version. Fun stuff!

Today's projects all came from this pad......


I wanted to challenge myself to see how much projects I can make with this 6x6 paper pad from Echo park. I have to say, it was quite a fun challenge figuring out how I can extend the papers to fit bigger projects like layouts but at the same time, the smaller versions of the images worked perfectly with cards and altered items. So without any more further babble from me, here's what I did....

Summer card set

I picked this collection because of the bright and fun designs. If you've been following my work, you know that I am at my comfort zone with bright fun designs/papers. They just bring so much smile in my face.


With this card, I used the bold colors but minimized the patterns. I really wanted the colors to pop. I also handcut some cute ice cream cones from the paper. Aren't they just adorable?


In here, I used one of the solid colored paper in the pack and added texture with it using my embossing folder. I also wanted to show off the fun theme park paper so I added solid colors in small doses to the card so it doesn't take away from this fun paper.


Now with this card, I went BOLD! Love that scallop multi colored paper. Nothing says summer to me that orange so I used that to make my own tag and added my sticker sentiment on it. I used the blue buttons to form my visual triangle in this card.

Beach Day


Again, these projects are all about challenging myself to make the most of the 6x6 paper pad, so I went with a double page layout. I'm glad I was able to work with these photos. I don't feel at ease when I have photos from two years ago still waiting to be scrapped. It was worth the wait though because the Echo Park papers were just want these photos needed to evoke the whole summer vibe of the layout.


I had cut out the letters from one of the solid papers in the pack using my die cut machine. I even got some inspiration from the title of the collection by adding stitch pen lines inside the letters of my title just like the way they did the paper collection title.


To add as much of the patterns of the pack in this page, I punched them out with a 1 3/4" circle punch and layed them in the middle of the spread. I love the stripe paper and decided to ground the page with them. Since they're only 6" in length, I added some embroidery stitching to connect them to each other. It turned out great because the stitching created an extra dimension to the page. For the journaling block, I used my die cut machien again to cut out a fun shape from the orange paper, and because it was already lined, adding my words to the page was a breeze to do.


I have some tools from Epiphany crafts that I am able to personalize my buttons. I used the light blue solid paper from the pack to make my buttons match perfectly with the rest of the products in this page.

Summer canvas banner


and finally, what better way to welcome the season with a banner?! In this one, I used a Maya road canvas banner set as my foundation. I colored it with some Tattered Angels Glam paint to add the yellow to the canvas. I especially chose this type of paint because it has shimmer in there. Adding that bit of glitter to the project reminds me so much of how the ground shines when sun hits it.


After painting the canvas, I used the papers to add design and pattern. Nothing says summer better than bold, bright colors and these papers delivered that for me.


I used my die cut machine to cut out letters for the title using solid paper from the pack.


I connected all the pieces with white ribbon and tied some bows in each connection then finishing it off with a bling.


And after seeing how great the effect of the glam paint was with the canvas, I decided to add some to the paper rosettes too.

Speaking of the paper rosettes, I decided to share with you how I did them. They are super easy and I've learned that the length of the papers won't deter you from making these fun embellishments.

First, you need to gather your supplies. I have paper, glue gun, a circle punch and a strip of strong adhesive (I used ribbon adhesive).


Next, you cut out your papers. I cut mine into 1" strips. With the size of rosette that I wanted, I have to cut four strip from one 6" paper.


Then you fold them accordion style. I've seen people use scoring pads/boards for this but I'm the "my hands are good enough" type of gal so I that's exactly what I did here. :)


After that, I used a tiny strip of ribbon adhesive to connect the papers into one long strip. I overlaped the fold to make the seams tidy looking.


Next, I added one more strip of adhesive to the the pape folded strip to connect them into one big circle. I then punched out two circles from coordinating pattern paper.


then I glued the rosette onto the circles. At this time I formed it into the size the I wanted it to be, if you want a smaller one, make the gap inside the circle close together, if you want your rosette bigger, make the gap larger.


Top the rosette with another circle and viola! your done.


Now you just need to do it 5 more times and you'll have enough to spell out summer.


They are pretty easy, won't you agree? You can make this handmade embellishment for cards, layouts, homemade medals and award pins and of course for a banner just like mine. :)


So that's it. Thank you for going though a long post. I hope you enjoyed your visit today and these project inspired you to celebrate the season with your own homemade projects .


Have a fun summer.


Till next time,

Grace

Tuesday, June 7, 2011

The Sweetness of Cake Making

I love it when it's only the 7th day of the month and I'm done with all of my design team assignments. It's such a relief and the fact that I have all the rest of this month to "play" just gets me all excited and giddy.

So one of the things I did to start playing was to be inspired by the latest Pagemaps blog sketch and here's what I made....

The Sweetness of Cake Making

the sponsor for this challenge was My Little Shoebox. Now we don't have to use their products BUT I have accumulated a good amount of their papers and so it was the best time to put them to use in this layout, don't you think?
These are photos of my little "cake making/fondant making" lesson I had last year. You can read my post about it in here. I used mostly pinks and yellow in this layout since that's the main colors of my cake. I also added some blues, greens and a bit of orange and black to add some more pop to the page.


I decided to add some dots of Pearl pen from Viva Decor (love those stuff!) around the blue paper, mimicking the circles on the bottom portion of my cake. I also sprayed glimmer mist on the flowers and heart die cut, just because I wanted them to "shine" in this page. :)


my title with a combo color of orange and black. The orange ones are from MLS and the black chipboards are from Basic Grey.


I'm addicted to texture and dimension. In this page, I used some U Cut it foam from Glue Arts to raise my die cut shapes and flowers. I also added a ribbon in there for more texture.


Thanks for stopping by.


Till next time,

Grace

Sunday, June 5, 2011

Never say never....

Did I get your attention with that title? Well I'll talk about that later on but first let me share with you what we did this weekend..


If you've been following this blog, you know that my family usually go on a "day trip" somewhere local wether it be to the park, hiking trail or museum, we're always doing something on Saturday. Well yesterday was still a day to go out (thankgoodness for the sunshine) but instead of driving around the area and exploring we stayed in our home and dealt with this patch of land in the backyard...


Because the sunshine is upon us here in the Springs, it means that we have a go signal from mother nature to start a garden. Now mind you, I've been hearing all sorts of negative things about gardening from locals and friends. They said that it's hard to maintain a vegetable garden around here because of the ocassional hail storms in the summer and the short period of planting since our weather didn't become "garden" friendly till June. But, you know me, I tend to not listen especially when I'm so itching to change this patch of what I'm just assuming to be sometype of expensive flowers to a vegetable garden patch.


So Friday, I started working on it. I was doing it by myself thinking it'll be a great "me" time, pulling plants and weeds.


then I realized how long it'll take two hands to finish the job and so I called for some reinforcements...


I'm trying to be a good mom and not scream everytime dirt flew all over the place, except the garden because Marcus decided to dig like a dog! Maddie was fine, she decided that she'll save every worm she saw on the ground and place them on the edge of the patch. Until Dad told her that she's killing them if they're not in the ground. After that she started moving them around in the soil. Mitch used a shovel and turned the soil for me.


then on Saturday, I broke the blocks of soil with a rake that Mitch turned with the shovel and took out the loosed roots and weeds out of the ground. After everything was done, I had a clear patch.

Later in the afternoon, we went to Home Depot and purchased some small vegetable plants. When we had our garden in Cali we would use seeds and start with that since it was cheaper, but because we had to start so much later in the season for a garden, I decided to purchase ones that are already plants....


I didn't purchase a lot since they're 50 times more expensive than a seed and there weren't much selections, so we only got tomatoes, two kinds of peppers, onions and raspberry.


I placed the raspberry in it's own little plot. I hope this grows well and produce lots of great fruit.


and because the day seemed to all been work and no play, after dinner, we went down to our favorite parking lot and rode our bikes


We're tying to teach Maddie to ride her bike without training wheels. We decided to let her test her balancing skills on the smaller bike instead of new one she has so it'll be easy for her to put her feet on the ground if incase she looses her balance.


I love how this photo evoke what a wonderful dad Mitch is. He is definitely the man to teach the kids to ride their bikes, patient and full of great ideas on how they'll learn the skill. What a great dad the kids have!

ok so we now go to why I titled this post "Never say never". No, I'm not becoming a Justin Beiber fan, although I think he and Selena Gomez makes for a cute couple.....LOL.


No I was referring to this post, when I said that I'll never ride a bike again....


well a week ago, Mitch pulled out this old bike and said that I should "at least" try it once again. He gave me the "for the kids sake" schpill and I couldn't say no to that. So I tried and needless to say this time...I'm actually enjoying bike riding.


we have not ventured past the parking lot so I don't know how I'll do on hills and things like that but so far (crossing my fingers) there have been no accidents that have caused me injuries that scared me for life.


So the lesson of this story is....never say never and riding bikes is really something you never forget. I got on that bike and wobbled a bit but never fell. Who knew it was that easy?


Thanks for stopping by.


Till next time,

Grace

Friday, June 3, 2011

Projects to share

It's finally getting warmer here in the Springs. Finally it's feeling like Summer! Today the whole family and I worked out on clearing out an area in the backyard where we will try to grow a vegetable garden. I know it's kinda late in the season to start one but because of where we live and the lllooonnnnggg winter we have, now is the only time that we can do it. I'll share some photos soon.

In the meantime, how about I share some projects I made for design team assignments.....

Family Mini Album
PULLED OUT FOR PUBLICATION
Glue Arts teamed up with October Afternoon and I made this mini out of chipboard coasters (you know the ones you use at restaurants) with OA papers and Glue Arts adhesives. I made a tutorial for it and you can see it at the Glue Arts blog in this post.

Monogrammed Coin Jars

Also for Glue Arts, our team this week was kid projects. I recycled some tomato jars to create two coin jars for both the kids. Now they can start saving for their missions. LOL! Find the details and tutorials for this on the Glue Arts blog in this post.

Visiting the Whitneys

and finally one of the two projects I made for Upsy Daisy Design for this month. We were given a challenge to base our project from an image shared with us. The image is of a tomato vine. I grabbed the colors and the shape circles as my inspiration platform for this page.


I used a combination of papers from the Home Sweet Home and Vogue line. I also used letter rubons and brads from UDD.


the photos are from the Holiday season last year so the red and green matched perfectly with the theme of the page.

So that's it for me tonight. Super tired from digging, weeding and all things gardening. We are not done yet so I need to hit the hay to be prepared for more work tomorrow. Thanks for stopping by.


Till next time,


Grace

Thursday, June 2, 2011

Matchbook tutorial

I know I promised to make a tutorial about the matchbooks from last week's post. Sorry it's a bit late but I hope it'll be worth the wait. :)


So first you need to gather your supplies, which is not much...

You'll need...
pattern paper, preferably double sided
some cardstock, the amount will depend on how thick you want the inside pages of the book to be
Paper trimmer
ruler
hole puncher
ribbon
bone foler or popsicle stick
extra: border punch

Instructions:

1. Cut out the pattern paper to the size you like. For my heritage matchbooks, I cut them 4" wide by 11" long. Then I scored the paper using my bonefolder and a ruler. Scoring means creating creases/folds at certain points of the paper. You can also use your paper trimmer to make the score marks. Instead of running the paper trimmer blade through the groove, run your popsicle stick or bonefolder through.


I'm not sure if you can see my pen markings of the measurements but it's 2" on the left, then 1/4", then 4 1/2" then another 1/4" and then 4". If you are making a thicker book, you need to adjust the 1/4" parts to maybe about 1/2".


2. Then fold at the creases/scored lines.


3. I added a decorative edge to the shorter fold (2"one) with a border punch. This is an extra little touch, you don't have to do this if you don't want to.


4. Then you cut out your cardstock. Cut as many as you need. My size is about 4 1/4" long and 3 3/4" wide.


5. Place the cardstock papers inside, then fold the shorter end (with decorative border) over the papers and punch holes through all those papers. I didn't measure this. I'm an "eyeball" type of gal, you can easily measure and make marks with pencil if desired before punching your holes.


6. Thread your ribbon through the holes and doule knot to close.


To close the book, tuck the right piece under the left fold.


After this step you can pretty much to whatever you wish to your books. In the past,I've decorated the front with a solid color (to mute down a bit the patterns on the paper) then added a monogram chipboard or a layered flower accent in the middle.

You can use the books as gifts or fill the papers/pages inside and make it your own minibook.


I hope you guys enjoyed my little tutorial and my only request is that if you were inspired by this tutorial.....to pass it along. Link this post to anywhere you think it will be useful for or at. It's all about sharing for me. :)


Have a great weekend.


Till next time,

Grace

Memorial day adventure *photo heavy*

I know it's already Thursday and this is a bit late, but with kid's now on summer break and things just getting accomplished slower, the blog sharing kinda takes a hit.

But it's better late than never, right?!

Ok so let's move on, shall we.... can you tell that I really struggle at blog intros. LOL.

Last Monday, being that it was a big holiday and it's our first time not attending a ward breakfast at the park or going to family's house for swimming or get together, we decided to do some sightseeing instead.

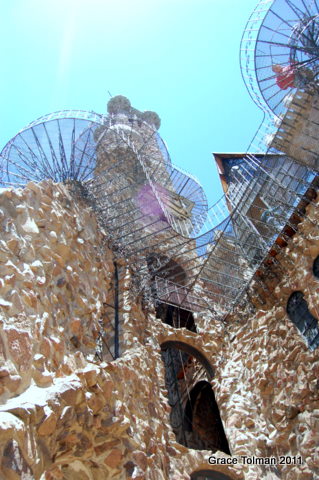
We first headed down southwest to Bishop's Castle. Mitch heard about this place last Sunday from a brother in the church, so he researched it online and we headed out to see it first thing Monday morning. Here's some photos....


Here's Marcus in a big humungous chair, located in the front side of the mansion.


let me give you a little background about this place......there's this man (his last name is Bishop, hence the castle's name) that decided to build this castle on his own. He's been working on it for years and continues to work on it through donations of people that visit. Touring it is free but they caution us (very highly with liability paperworks to sign and everything) that since it is an ongoing construction site that we are touring it at our own risk!


It's an interesting building but I WAS NOT impressed! Not only did it scared the HECK out of me knowing that the only way for me to see anything inside is to climb these metal steps THAT let me add gives me that fine view of how far I am from the ground, but it was just not tour friendly with all the debri and construction equipment around.


Here's my family going up the steep stairs. Mitch tried so hard to get me to go up but I know my limitations and THIS one is one of them. Oh and did I mention that it was SUPER WINDY TOO!!!


I did go around the castle and took pictures of it from the ground. :)


Yeah, you won't see any photos of the inside of the castle nor photos looking down. This family photographer wasn't about to scare her pants off just so we can take shots like those.


this little castle box is where people can put their donations. There's also a little gift shop to the right of this box where we can buy souvenirs and what not, which also helps Mr. Bishop continue to build the castle.


and here's my family up in one of the floors.


then another level higher. This is about where the kids decided that they've had enough heights. Mitch took them down and went all the way up to the top of this tower. It's funny because he said that once he got to the top, he's not usually scared of heights but because the wind was blowing so hard, he got a bit scared up there. The wind was blowing hard that the metal frame which is holding him was swaying.

Because this trip was not like what we've imagined, we tried to make the most of the rest of the day by going to the Dinosaur Resource Center in Woodland Park, about 15 minutes from the Springs. Here's some photos of that....


It's interesting to note that this place have been extracting fossils from all areas of the northwest then making cast replicas of them (in this same facility) and those fossil replicas are donated to all sorts of museums in the world.


this is a prehistoric turtle. I'm so amazed at how huge it is compared a fossil of the biggest turtle we have now.


fossils all over. Hanging on the ceiling and on the glass cabinet displays.


after our day trip we were famished. On our way home, we stopped by our favorite BBQ place in town- Rudy's and got some fine BBQ meat to go. Oh how I love their food.


So that's our day. Packed with driving and seeing sights and most of all, spending some fun time with the family.


Thanks for stopping by.


Till next time,


Grace

Wednesday, June 1, 2011

Hello Friend card *Cardabilities sketch #32*

Ok so I know I'm a day late posting this and I'm really sorry about the delay. Ever since the kids have been out of school, I've kinda lost track of days and dates. Mybad!

Hello Friend

so the latest Cardabilities sketch is by far my favorite one. Circles are not my go to shape, my "design mind" always goes for the squares and rectangles because they're easy to put together but having this challenge really got me thinking out of my comfort zone.


the sketch also allowed me to use these circle pattern papers with sentiments on them, which I've been hoarding for quite a while. Love it when things turn out ok.


So that's it. Make sure you check out the rest of the dt's take on the sketch and play along too. There's always something fun to learn when you play with sketches.


Oh and don't forget, Cardabilities are having a dt call right now. Check the details at the blog too.


Till next time,

Grace