Everyone has a story to tell, here's mine sprinkled with some creative projects along the way.
Thank you for stopping by and I hope you come back again.


Tuesday, May 1, 2018

DIY Home organizing labels *Mother's Day gift idea* (Glue Dots Project)

Hi there friends. Mother's day is just around the corner and if you are looking for a practical gift that has a DIY flair, please check out my project below. 


Give the organizing mom in your life some cute and useful container labels. The best part of this gift is that she can write whatever she wants on the chalkboard labels and erase it easily too. Everything came together efficiently and with little mess because I used some Glue Dots® adhesive. 


DIY Home organizing labels
Designed by: Grace Tolman
Time: Approximately 45 minutes
Level: Intermediate
Size:  4 ¼ x 3” (with ribbon); 2 1/3 x 3” (without ribbon)

Materials
        Cardboard- (thin) Source Unknown
        Pattern papers- Let’s Polka in the Meadow, 6x6 paper pad, Lawn Fawn
        Ribbon - Source Unknown
        Wood shapes- Woodsies, Loew-Cornell

Tools:
        Ultra Thin, Glue Dots®
        Chalkboard Paint- Americana, Deco Art
        Label die- Labels Eight, Nestabilities, Spellbinders
        Manual die cut machine- Cuttlebug, Provo Craft
        Scissors
        Chalk- Crayola


Directions:
1.       Paint the wood shapes with chalkboard paint. Make sure to pain the sides as well. Set aside to dry.
2.       Die cut the think cardboard and the pattern papers with the desired size of label die. I used the fourth from the biggest size. Make as many as you need/want.
3.       Adhere a piece of paper over the cardboard using some Ultra Thin, Glue Dots® adhesive. Adding the cardboard to the paper makes this label sturdy for everyday use.
4.       Cut a piece of ribbon about 8” long. Add the ribbon loop to the back side of each label using some Advanced Strength, Glue Dots® adhesive.
5.       Adhere the chalkboard wood shape in the center of the labels with some more Advanced Strength, Glue Dots® adhesive.

Option: You can skip the ribbon and add Advanced Strength, Glue Dots® adhesive to the back to adhere to a box or basket.


 I hope this has inspired you to create something personal for the mother or mothers in your life.

Till next time,
Grace

Monday, April 30, 2018

10 Cards, 1 Homemade kit (May 2018 edition) Product Reveal

Hello friends and happy Monday. I've been doing this fun series in my YouTube channel for about a year now where I gather some papercrafting products, create my own "card kit" and then make 10 handmade cards out of it. I then record my process of how I created the 10 individual cards and share it on YouTube. I have had some success with this series and I thought I would add it to my blog as well since some people might like seeing the photos of the finished cards in depth. 

So if you have not seen this video, you can start with this one. And if you want more, you can always check out the link to my YouTube channel on the side bar of this blog. I have a specific play list for my 10 handmade cards, 1 homemade kit series. 

Today I'm sharing the products that I pulled from my stash. Watch it here...


And here are some glimpse of what I was able to create with this kit. I gotta say, this is, if not my favorite, definitely one of them from all of the kits that I've put together. I just love the colors, the products and the techniques that I was able to use here. 

Thank you for stopping by.

Till next time,
Grace

Wednesday, April 25, 2018

You Are One of a Kind *Double Page Layout Mini Series*

Happy Hump day! Today is the last share in my double page layout mini series. I have enjoyed creating these pages and I hope you have enjoyed watching my videos and taking a peek at my process. 
Here's the video for this particular page...
And some close ups...


I can't believe that in a matter of months, this little guy will be 4. Time sure flies fast.

Thanks for stopping by.

Till next time,
Grace

Monday, April 23, 2018

Today Was Totally Awesome *Double Page Layout Mini Series*

Happy Monday friends. I am here again to share with you another double page layout. This is the page #4 of my latest mini-series. With this one, I decided to mat my photos so that it would stand out against my busy background. 

Here's the process video that goes with this page...


and here are some close ups...


So what do you think? Did this page inspire you to create a layout with multiple photos?

Till next time,
Grace

Friday, April 20, 2018

So Happy *Double Page Layout Mini Series*

It is Friday. Woohoo! What are your plans for the weekend? Mine would be trying to squeeze more crafty projects before I start another semester of school on Monday. Speaking of crafty projects, here's my third page in my latest mini-series. 


And here's the process video for this page...

And here's the close up photos...


Thank you for stopping by

Till next time,
Grace

Thursday, April 19, 2018

Peace and Love layout *ScrapRoom blog sketch challenge entry*

Happy Thursday dear friends. Today I'm sharing a layout that I created with the latest sketch challenge over at the ScrapRoom kit club blog....

And here's my take on the sketch...
I know the photos are super dark but I still wanted to document this precious moment for me and my son. It was his first time to enter our church temple (LDS) so it was special, despite the ugly lighting. 

I had been on a "use up my scraps" kick lately and this layout was made by pure scraps alone. The only new papers used were the background cardstocks.


I even a couple of brads that matched the color scheme and I'm so glad that I was able to use them up here.

So there you have it. Thanks for stopping by.

Till next time,
Grace

Wednesday, April 18, 2018

DIY Farmhouse Wreath

A double post from me today. Wow! Who am I and how did I manage that? Honestly, I have no clue! LOL. But since I have you here already, let me share with you something fun I did recently. I have been in this "farmhouse design" kick lately. I try not to follow trends too much because I find that they fade quickly. However, the whole simplistic, rustic and homemade feel of the farmhouse design aesthetic spoke to me and I have been crazy working on making my home have that feel. I will have to create a blog post sharing ALL of the projects I created recently for it, from wood design to even sewing up some new pillows. Even my daughter said she is loving how my little DIYs are making our home "prettier". 

Anyways, so this wreath was inspired by the coffee filter wreaths that I've seen in the blogosphere. However, instead of using coffee filters, I used some vintage lightweight paper that I've had in my scrapbook stash forever and a Spellbinders nestabilities die


 The paper is from Die Cuts with a View and like I said, it is lightweight. Kind of the feel of a book page. So it was easy for me to crumple. I also used a foam wreath ring.

 First I used the die to create my scallop circle. I started with the biggest circle since I wanted it to resemble the coffee filters. But then I had all of these scraps and wanted to maximize my papers so I also cut two other smaller sizes. I don't know how many I was able to cut from the papers, but if I were to guess it was about 100-200 scallop circles.


Then with a highlighter (you can also use a sharpie or any thicker pen/marker) I crumpled the paper towards the center, added a dab of hot glue on the back side and then adhered it to my wreath. I did this until I was happy with the "fullness" of the wreath.


 I decided to leave the back plain so that the wreath can rest on the wall without any bulkiness.

 To add some "vintage" feel to it, I misted my papers with this Maya Road mist. It has glitter but also with some dark tint to it.

 To display my wreath, I added some blue sheer ribbon and a bow. I adhered it to my wall with a thumbtack. No need to drill any holes if I can get away with it.

And here's a close-up.

Love, love, love the result. What do you think?

So I didn't really use any of the smaller circles that I had cut and so I will be getting a smaller wreath ring so I can make a smaller version of this. I also would like to create a "frame" for this wreath with a reclaimed window or something like that. What do you think?

Thank you for stopping by.

till next time,
Grace

Independence Hall *Double Page Layout mini series*

Happy Wednesday. Today's share is another double page layout. This one still involved multiple photos, 3 pattern papers, 2 white cardstock base and a Scrapbook Generation sketch.


Watch how I created this page...

And here are some more close ups...


Thank you for stopping by.

till next time,
Grace

Tuesday, April 17, 2018

Our Happy Place layout *double page layout mini series*

Hello friends. Double page layouts have been my scrapbook "jam" since the beginning. I take lots of photos and trying to cram them into one page just doesn't seem right. So even though the trend moved away from 2-page layouts, I did not stop doing them. 

So to "catch up" on some family documenting, especially of our trips and adventures, I decided to put together a mini-series that is all about double page layouts. Here's my first page. 


Here's the process video...


This layout and the other ones that are part of this mini-series will include a certain formula inspired by the kits created by Scrapbook Generation. All my page kits include 3 pattern papers, 2 white cardstocks, and a sketch from Scrapbook Generation. 

Here are some more close-ups...


Wednesday, April 11, 2018

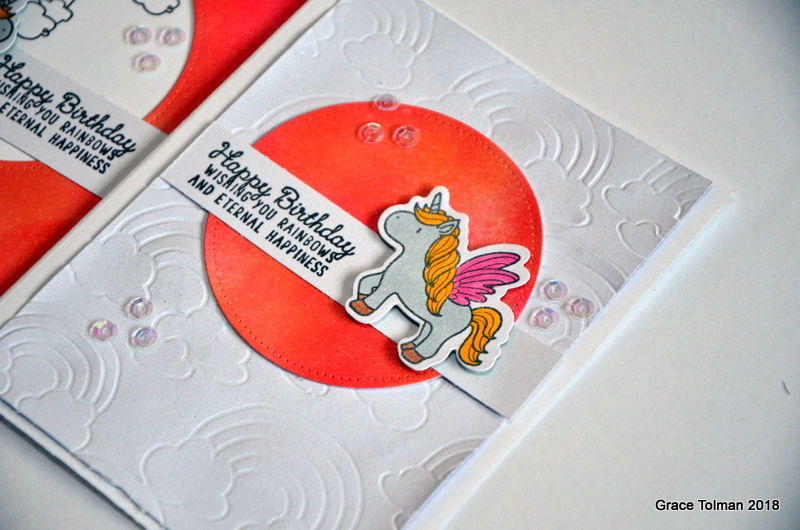
Unicorn Birthday Card Set *Cards in Envy Challenge Entry*

Hello friends. How has your "hump" day so far? It seems like I am on a roll on making cards. Are you enjoying these kinds of shares?

Anyways, today's cards were inspired by the latest challenge over at the Cards in Envy challenge blog. The theme was to "Create a card with the NEGATIVE space of a die or punch" 

And here's what I was able to create...
So I started off with a piece of white cardstock trimmed to about 1/4" smaller than an A2 card base. I then added some color to it by blending a few distress mini ink pads and applying it to the piece with a blending sponge tool. I used two pink and one orange hue for my background. then I even misted it with some clear glimmer mist for some shine. 

After that was dried, I cut out a circle from the center. For the first card, I used the negative piece and added it to a white card base. I had this unicorn stamp set from Hampton Arts and added some clouds and the castle image onto the card front then stamped the unicorn and sentiment on a separate piece of white cardstock. I colored the unicorn and cut out with a coordinating die set. 

I finished off the card with some clear sequins. 

 For the extra card, I didn't want to waste the positive part of the circle so I used that as the center of another card. This time, I used a rainbow embossing folder on another piece of white cardstock for the background. I liked the subtle design it provided. I also misted this with some clear shimmer so there's a bit of sparkle on it.

 So which card do you prefer, the one with the negative space or the more simple one using the positive circle?

Thank you for stopping by.

Till next time,
Grace