Everyone has a story to tell, here's mine sprinkled with some creative projects along the way.
Thank you for stopping by and I hope you come back again.


Showing posts with label challenges entry. Show all posts

Tuesday, April 7, 2020

Warmest Wishes Card

Hello my dear crafty friends.
It's been a crazy few weeks all over the world. I pray that you are safe and healthy as we all ride out the pandemic we call COVID-19. My kids and I are following the stay-at-home order while hubby is working hard since his job is considered an essential one.
I have found that I've held onto my love of papercrafting more now than I have in the past few months. It has helped me cope and the ability to make something with my hands have soothe the anxious feelings of an unknown future.
And since I had the time, I decided to join in some challenges. The first one would be last week's sketch challenge over at the My Favorite Things blog. Here's the sketch...

And here's my take on it....


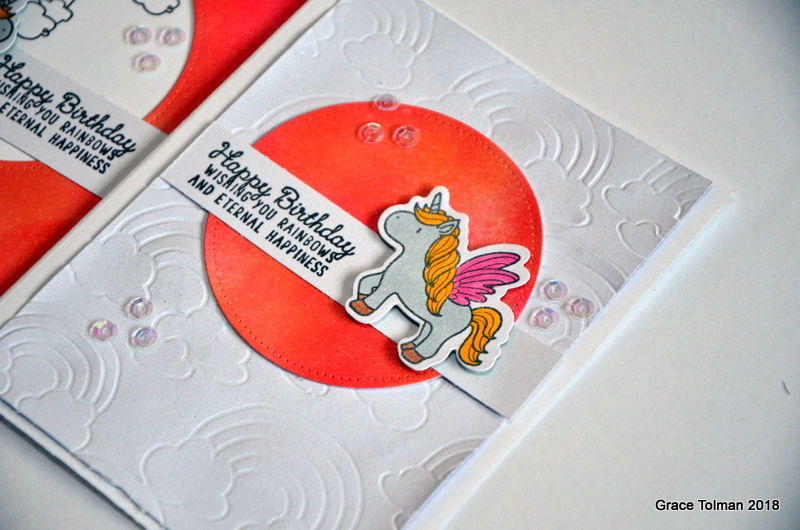
I recently purchased some dies and stamps from MFT and I was eager to "play" with them so this sketch came at a good time. Since I didn't have any tag similar to the sketch, I decided to use a rectangle stitch die for my frame.

I did use the scallop frame from the Blueprints #27 for my background and I love it. You will probably see more of that die in my future cards. It's just so versatile.

I also wanted to do some coloring and found this cute image from one of my Waffle flower stamps as my main accent. Then I used a sentiment from a Holiday stamp set from MFT. I love that "warmest wishes" can be for anything other than a winter sentiment.

Here's the list of the supplies I used:
Spiral 6x6 stencil/ Clear Scraps
Claire Stamp/ Waffle Flower Stamps
Snow Globe Sentiments/ MFT
Pinpoint Rectangle Layers/ Memory Box
Blueprints 27/ MFT
GG1, FS5, FS7, Poppy/ Spectrum Noir
Glitter gloss/ Nuvo Drops
Spiced Marmalade, Mustard Seed/ Distress Ink, Ranger
Pale Gold/ Nuvo Drops

Thanks for stopping by and till next time,
Grace

Wednesday, May 16, 2018

"Love Time Spent With You" layout *ScrapRoom Freaky Fast Friday challenge*

Happy Wednesday friends. Today I'm sharing a page I created with the latest Freaky Fast Friday challenge over at The ScrapRoom blog


I really like how this challenge helps me see my "scraps" in a whole different light. It also helps me move out of my comfort zone as far as design was a concern because I am already working with a certain group of precut pieces of paper. 

 I also used my homemade scrapbook kit for this page. I had fun using those small stickers from Bella Blvd.

I was inspired to color my wood shape brown to mimic the toast marks on the sandwich in my photo. I then added some Nuvo pink drops onto the edge to give it a bit more design.

There were two small strips of paper in the recipe for this challenge and I cut one end of it into a banner shape.

So that's it. Thank you for stopping by.

What is your favorite thing to do with scraps?

Till next time,
Grace

Friday, May 11, 2018

"15th Anniversary" layout *ScrapRoom JumpStart Sketch Challenge*

Happy Friday friends. Today I'm sharing the first layout I created with my homemade kit. This one was also inspired by the following sketch over at The ScrapRoom blog. 

I turned the sketch to its side since my photos are mostly vertical. I also wanted space to add four photos instead of the two that were shown in the sketch. 

I had these chipboard shapes within my homemade kit and I dressed one up by heat embossing it with some red powder. I backed up the piece with a red dot paper too.

This "you & me" sign was from a 3x3 piece of cut apart paper and I just fussy cut around the image to create my embellishment. I also added it with some foam adhesive to give it some dimension.

This "so happy" piece is part of a 3x4 paper. I used an exacto knife to cut around the design and tucked the bottom of my photo under there. That way I have both my image and the words showing on my page.

That's it for me today. I hope you have a great weekend and advanced Happy Mother's day to all my mommy blog readers out there.

Till next time,
Grace

Thursday, April 19, 2018

Peace and Love layout *ScrapRoom blog sketch challenge entry*

Happy Thursday dear friends. Today I'm sharing a layout that I created with the latest sketch challenge over at the ScrapRoom kit club blog....

And here's my take on the sketch...
I know the photos are super dark but I still wanted to document this precious moment for me and my son. It was his first time to enter our church temple (LDS) so it was special, despite the ugly lighting. 

I had been on a "use up my scraps" kick lately and this layout was made by pure scraps alone. The only new papers used were the background cardstocks.


I even a couple of brads that matched the color scheme and I'm so glad that I was able to use them up here.

So there you have it. Thanks for stopping by.

Till next time,
Grace

Wednesday, April 11, 2018

Unicorn Birthday Card Set *Cards in Envy Challenge Entry*

Hello friends. How has your "hump" day so far? It seems like I am on a roll on making cards. Are you enjoying these kinds of shares?

Anyways, today's cards were inspired by the latest challenge over at the Cards in Envy challenge blog. The theme was to "Create a card with the NEGATIVE space of a die or punch" 

And here's what I was able to create...
So I started off with a piece of white cardstock trimmed to about 1/4" smaller than an A2 card base. I then added some color to it by blending a few distress mini ink pads and applying it to the piece with a blending sponge tool. I used two pink and one orange hue for my background. then I even misted it with some clear glimmer mist for some shine. 

After that was dried, I cut out a circle from the center. For the first card, I used the negative piece and added it to a white card base. I had this unicorn stamp set from Hampton Arts and added some clouds and the castle image onto the card front then stamped the unicorn and sentiment on a separate piece of white cardstock. I colored the unicorn and cut out with a coordinating die set. 

I finished off the card with some clear sequins. 

 For the extra card, I didn't want to waste the positive part of the circle so I used that as the center of another card. This time, I used a rainbow embossing folder on another piece of white cardstock for the background. I liked the subtle design it provided. I also misted this with some clear shimmer so there's a bit of sparkle on it.

 So which card do you prefer, the one with the negative space or the more simple one using the positive circle?

Thank you for stopping by.

Till next time,
Grace

Tuesday, April 10, 2018

Birthday Present card set *Lawn Fawn Challenge Entry*

Hello friends. I have been busy making a bunch of cards lately. They are filling my need to be creative without spending as much time as I do when I make a scrapbook page. Plus since I've been repeating the same design to make multiple variations, I am filling my card stash pretty fast. 

Today I created a card based on the latest Lawn Fawn blog challenge. 

The gift box images are from the Bows and Holly stamp set. The sentiment is from the Scripty Sayings, and the papers are from the "Let's Polka in the Meadow" 6x6 pad. 

I had fun coloring in the gift boxes. I didn't' do any shading on these as I'm not that good at that yet. I did add some pearl pen dots to each present for a more festive look.

So there you have it. Thank you for stopping by and hope you come back again soon.

Till next time,
Grace

Monday, April 9, 2018

Floral Card Set *My Favorite Things Card Challenge*

Happy Monday friends. Today I'm sharing a card set that was inspired by the latest sketch challenge over at the MFT challenge blog
With this simple sketch, I was able to create 8 similar cards...
I started off with four cardstock pieces cut a tad smaller than an A2 card size then run them through my Cuttlebug with 4 different embossing folders. Next, I stamped some floral stamps (mine was super old) on white paper and then heat embossed them with white powder. Then I pulled out my distress mini ink cubes and did some resist color blending.  

After I did all of that, I cut each block into two pieces, cutting them into an angle. And since I have two pieces of each one, I was able to create 4 similar cards but have totally different looks to them. I finished off each card with a brown strip of cardstock, about 1/4" just to cover the seams where the two angled pieces of paper met. Plus I die cut some "hello" and "thanks" words from the Thanks and Hello die (MFT 906) die cut set from MFT. I die cut the words three times for the black ones making it really thick. I added some Nuvo drops to each card for some finishing touches. 

Here are a look at the cards in detail...


 Thank you for stopping by and I hope you have a crafty Monday.

Till next time,
Grace

Tuesday, March 27, 2018

"Our Cool Library" layout *Stuck Sketches blog entry*

Happy Tuesday my dear friends. Hope you are all well. I am still plugging away with my latest homemade scrapbook kit and my latest page was inspired by the most recent sketch over at the Stuck?! sketch blog....

And here's my take on the sketch....
Since I had more photos than the 2 squares within the sketch, I expanded my block to mostly the entire center of the page. I did add the banners to the left and right to stay true to the sketch. I moved my title and journaling to part of the larger block to fill up the space and complete my "grid". I had this negative space of the vellum piece (that I used in another page) and decided to add that here to frame my block/grid. 

Here are some more close ups...

I made my own bubble hexagon embellishments with pattern paper, tiny word stickers and some bubble stickers from Epiphany crafts.


I also added some homemade enamel dots in this layout. I am finding a new appreciation for my supplies that I can make my own embellishments from.

So there you have it. Thanks for stopping by.

Till next time,
Grace

Tuesday, March 20, 2018

"Thankful to Start A New Year" layout (The Scraproom Blog Challenge)

My latest page was inspired by the latest sketch from The ScrapRoom kit club blog

I created this using my latest homemade kit. I love the "springy" feel of this kit and the colors are just within my comfort zone. 

I used a die cut title and then smaller letter stickers to complete the full title.

This balloon was cut out from a Simple Stories paper. I love being able to use some paper images for my embellishment.

This color burst design is actually a rub on and it added some colors to this part of the page.

Thank you for stopping by.

Till next time,
Grace

"Just Awesome" layout (The Scraproom challenge)

I have been trying to find new creative ways to use my scraps of paper. And then I remembered the Scraproom kit club's Freaky Fast challenge. This one requires you to use a specific formula for cutting papers and use all of them for a page. 

I also used some cut files free from the Paper Issues blog.
I used products from my homemade scrapbook kit and I love the bright and fun colors of this kit. And because I could only use a certain number of papers, I pulled out some die cuts, washi tape and stickers to add some more details to the page. 

The cut file was cut with black cardstock which makes it stand out against all of the colors in this page.

The heart banner was a cut file as well. It was a left over from a previous page.

So that's it. Thank you for stopping by.

Till next time,
Grace

"Simply The Best" card (Reverse Confetti Sketch Challenge)

Sketches have been my favorite way to jumpstart my creativity. This one was from the latest Reverse Confetti stamp sketch challenge. 

Like I said in the previous post, I have started to make more than one card of the same design that I was making. It just makes sense since I have all of the products already on my table. 

With this card, I used the Here's The Story (RVC019) stamp set. This is one of my favorite sets for my scrapbook pages since it has a bunch of great phrases and words but it also works well for a masculine style card set. 

 I used the phrases and words to create my own background paper. I used the striped pattern paper as the inspiration for the colors of my ink. I liked the combo of the blues, greens and yellows.

I then heat embossed the sentiment "simply the best" with gold powder. I added some letter stickers to complete the card sentiment. I added some fun foam to the circle die cut to make it stand out against the busy background.

So that's it for me. Thank you for stopping by.

Till next time,
Grace