Everyone has a story to tell, here's mine sprinkled with some creative projects along the way.
Thank you for stopping by and I hope you come back again.


Showing posts with label altered item. Show all posts

Wednesday, September 25, 2019

Autumn Treat Boxes (September 2019 Flavors of the Month Kit from The ScrapRoom kit club)

Hi crafty peeps! How's it going? Autumn is a great time to start the gift giving season. And what better way than to use some paper scraps and stickers to create some cute treat boxes. These ones were made from leftovers from the September 2019 Flavors of the Month Kit from The ScrapRoom kit club

Products used: Carta Bella “Fall Market”
Stash items used: Brown Twine (American Crafts); 123 Punch board (We R Memory Keepers)
Notes:
I usually create three cards every month, but this time I wanted to switch things up a bit. I loved the papers and stickers from the Carta Bella line but I didn’t have any pictures to match so I just made some treat boxes with the themed products. 
I used a tutorial from You Tube to create my boxes. You can find it here- https://youtu.be/LgYmZyk4MHg
I wrapped some twine to the belly band of the boxes for a “natural” feel to it. 

And here are some close ups....


Will you make one, or 20 of these cute boxes today? If so, let me know what you'll put in them.

Till next time,
Grace

Wednesday, April 18, 2018

DIY Farmhouse Wreath

A double post from me today. Wow! Who am I and how did I manage that? Honestly, I have no clue! LOL. But since I have you here already, let me share with you something fun I did recently. I have been in this "farmhouse design" kick lately. I try not to follow trends too much because I find that they fade quickly. However, the whole simplistic, rustic and homemade feel of the farmhouse design aesthetic spoke to me and I have been crazy working on making my home have that feel. I will have to create a blog post sharing ALL of the projects I created recently for it, from wood design to even sewing up some new pillows. Even my daughter said she is loving how my little DIYs are making our home "prettier". 

Anyways, so this wreath was inspired by the coffee filter wreaths that I've seen in the blogosphere. However, instead of using coffee filters, I used some vintage lightweight paper that I've had in my scrapbook stash forever and a Spellbinders nestabilities die


 The paper is from Die Cuts with a View and like I said, it is lightweight. Kind of the feel of a book page. So it was easy for me to crumple. I also used a foam wreath ring.

 First I used the die to create my scallop circle. I started with the biggest circle since I wanted it to resemble the coffee filters. But then I had all of these scraps and wanted to maximize my papers so I also cut two other smaller sizes. I don't know how many I was able to cut from the papers, but if I were to guess it was about 100-200 scallop circles.


Then with a highlighter (you can also use a sharpie or any thicker pen/marker) I crumpled the paper towards the center, added a dab of hot glue on the back side and then adhered it to my wreath. I did this until I was happy with the "fullness" of the wreath.


 I decided to leave the back plain so that the wreath can rest on the wall without any bulkiness.

 To add some "vintage" feel to it, I misted my papers with this Maya Road mist. It has glitter but also with some dark tint to it.

 To display my wreath, I added some blue sheer ribbon and a bow. I adhered it to my wall with a thumbtack. No need to drill any holes if I can get away with it.

And here's a close-up.

Love, love, love the result. What do you think?

So I didn't really use any of the smaller circles that I had cut and so I will be getting a smaller wreath ring so I can make a smaller version of this. I also would like to create a "frame" for this wreath with a reclaimed window or something like that. What do you think?

Thank you for stopping by.

till next time,
Grace

Monday, September 14, 2015

Autumn Table Runner *Glue Dots project*

I love using the Removable, Glue Dots® adhesive as a mask. In this project, I added some autumn leave accents on my Oly Fun craft material with ease using this mask technique.
Autumn themed table runner
Designed by: Grace Tolman
Time: Approximately  1 ½ hours (including drying time for the paint)
Level: Beginner/Intermediate
Size: Approximately 3 ft x 1 foot

 Materials:
Craft material, Oly Fun (Lemon Drop)
Ribbons- Ribbon Boutique
Spray paint- Espresso, Krylon
Cardstock- Orange, Bazzill
Thread- Coats and Clark
Sequins- Source Unknown
Leaf cut file- Silhouette store
Tools:
Removable, Glue Dots®
Glue Lines, Glue Dots®
Mini, Glue Dots®
Sewing Machine- Kenmore
Scissors
Die cut machine- Cameo, Silhouette

 Directions:
1. Create a bunch of leaf share with your electronic die cut machine. Cut them out using some cardstock.
2. Cut two pieces of Oly fun craft material measuring 3 ¼ x 1 ¼ feet.
3. Take one of the craft material piece, adhere the cardstock leaf randomly on the material using some Removable, Glue Dots® adhesive. Spray the brown paint. Pull out the leaf carefully and set aside to dry.
4. Once dried, sew the two front sides of the fabrics together on three sides. Turn it over. Fold the last side and sew to close.
5. Add some veins on the leaf by sewing some straight stitches with the sewing machine.
6. Cut out ribbon to the length of the table runner. Add them to the edge of the project using some Glue Lines, Glue Dots® adhesive.
7. Add some sequins randomly on the table runner using some Mini, Glue Dots® adhesive.


Thank you for stopping by. Make sure to stop by the Glue Dots blog for more crafty inspirations.

Till next time,
Grace

Friday, March 6, 2015

Pin To Done- Burlap Wreath

Hi there crafty friends and happy Friday. Today I'm sharing with you this month's "pin to done" project that I was able to finally check off of my long Pinterest list.

I have made wreaths before but because they are always seasonal, there's not one of them that I can just place in the front of my door and leave it there till I remember to change it out. For this reason, I decided to create one from burlap. I had watched some videos and looked at Pinterest for ideas and the two that I got my inspiration from is from here and here.

I was so happy to score a straw wreath at Goodwill in December and also a burlap trim pack from Tuesday Morning on sale. I also got the pins from Tuesday morning. 

I followed the tutorial on how to fold the burlap. My trim wasn't quite 4" so I made my squares 3 inches instead. Because my squares were smaller, it required for me to fill the front more and so if you look closely, I wasn't able to cover the sides very well. That doesn't bother me much though as I think some of the straw wreath showing up blends with the color of the burlap. 

I added a bow with leftover trim on the top and added an orange silk ribbon for a pop of color. I had some tiny banner stickers from my scrapbook stash that I hot glued to a piece of twine and strung it on the top of the wreath as well. 

Here are some more close ups...


Thank you for stopping by and I hope this inspired you to create a wreath or home decor to brighten up your home.

You can visit my Pinterest page with wreath ideas for more inspiration.

Till next time,
Grace

Wednesday, January 28, 2015

What's new in the store....

Hello friends. One of the things that I would like to do once a month in this blog is to share with you what's new in my Etsy store. I hope this will help you as you navigate my papercrafting store. If you have not visited the store in a while, you can check it out here. Graceworthy Designs etsy store carries handmade card sets, minibooks and sometimes even products. 

This month, I added some of my most popular gift sets- Altered Post it note holders. Each listing comes with three post it note holders and I have three currently in the store. Here's a little peek at them...


These are great for gift giving and it definitely makes jotting down important notes more fun. If you would like to see more images of these items as well as the rest of the items in the store, please click here.

Thanks for stopping by.

Till next time,
Grace

Friday, January 9, 2015

Pin to Done- Weekly Menu Board

Hi there crafty friends. One of the things I wanted to accomplish this year is to actually put some of my over 6,000 pins to good use. Anyways, I am resolving to get some pinned items done and I'm calling this (hopefully monthly) post "pin to done". 

For my first post, I am sharing a weekly menu board that I made using a picture frame, vinyl and my ever so helpful Silhouette Cameo machine. 


One of the things that I really wanted to focus on this year is to be more organized. Now I can't say that I'm totally disorganized but sometimes I feel that my life can be more efficient if I just take the time to organize and plan. So to start fixing this problem, I went with one of the most annoying things that my kids ask me every.single.day- "What's for dinner?" Here are some of my inspirations....

I bought a frame at a local outlet store and I've had that brown vinyl for a while now so I went with that color. I liked the chalk board in Inspiration #3 but knew that if I went that route, it would take me longer to accomplish this project. 

The first thing I did was clean up the glass on my frame. I didn't want it to be dusty as the vinyl might not stick well. Then I went through my stash of scrapbook papers and picked out a pattern that's not too busy and yet cute enough to stand behind the letters. Chevron is very popular right now and the yellow reminds me of sunshine so I went with that paper. 

Next, I typed up the letters that I wanted cut. When I look back at my inspirations, I knew that the days of the week letters needed to be skinny enough that there will be plenty of room to write up the dishes next to it. I also liked the combination of scrip and sans serif fonts here. Adding the letters to the glass was the longest part of the process for me. I didn't have a transfer tape so I had to do it one letter at a time. I made this frame on a Saturday where I knew I had plenty of time to create. I was also watching a show on Netflix while I made this. I used a strip of washi tape to make the letters aligned. I used the tape as a rule or some sorts, taping it on the bottom of the first letter of the word and then adhering the rest. After every word/day, I pulled it out and then repeated the process for the following day. 

I loved the distressed white look of the frame but thought it needed something else, so I added three flowers using some hot glue. 

I even added a sharpie on the back so I won't have to search for a sharpie when I'm revising the menu. I added it with some velcro. I adhered it with some more hot glue.

Thanks for stopping by and if you've done any project from your pin boards, comment below. I might just pin your idea to make in the future.

Till next time,
Grace

Tuesday, December 30, 2014

My top 10 favorite projects of 2014

Hi there friends. Today I thought of doing a recap of my favorite projects from this year. You can click on the specific blog posts for that project on the title and I will share a little bit of why I consider them as my faves from 2014. Here we go...

This is one of my fave altered projects for this year because it not only is super cute but it's also practical. I use this bag as my scripture carrier and it just brings a smile on my face every time I pick it up. 

I chose this layout because I got it done pretty quick plus it showed some of cuts from my Silhouette. It's an evidence that I'm finally getting a hang of my "new" toy.

Love this altered frame too. I love how simple yet full of texture and dimension this project has. Plus the quote is perfect. 

I chose this card because it shows some of the things that I've tried to incorporate stamps in my card. I also like my attempt for coloring. I've definitely tried lots of techniques this year. 


This is one of the few mini albums I made this year. I love how super easy this all came together plus the vintage items in it are so cute.

I treasure this layout because of the story and how easy it came together. This also shows the recurring theme of my pages this year....lots of layers and handwritten journaling. 

I chose this as one of my faves because it was one of those projects that I've been wanting to do and it helps bring some cute craftiness in my home.

I love, love, love this layout because a. all the papers here are from my scrap stash; b. love those owl stickers; and c. I finally used some gesso. It was definitely fun to play with that medium. I'll have to do it more.

This one was also a favorite because it shows my love for color. I gravitate towards bold, fun colors and this card shows that.

And finally, a project that is both adorable and had a purpose. We definitely enjoyed doing our Advent calendar this way. It has helped us bring the true meaning of Christmas into our countdown.

Thank you for joining me today. I hope you continue to stop by my blog in 2015.

Happy New Year.

Till next time,
Grace

Monday, December 22, 2014

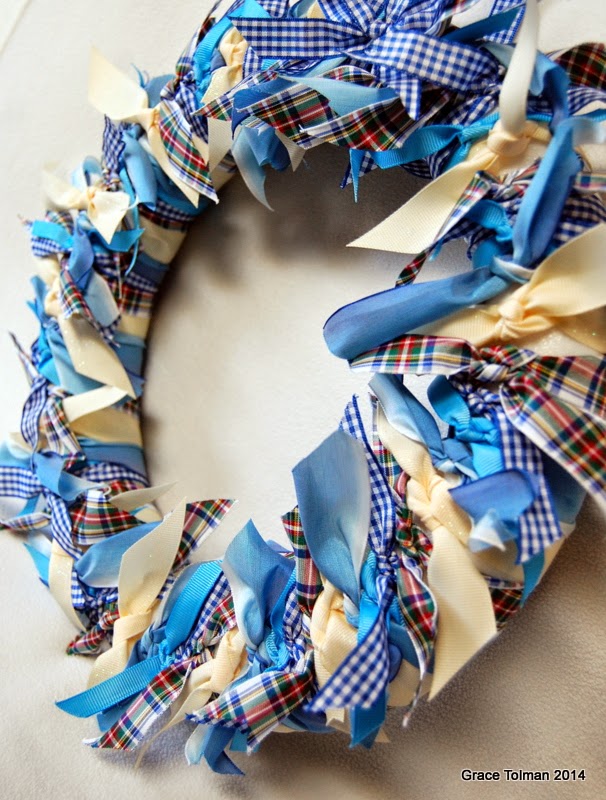
Winter Ribbon Wreath *Ribbons Unlimited Inc*

 Hello ribbon friends. Today I’d like to share with you a very fun way to showcase some of your favorite trims in a home décor project. Winter is just around the corner and so why not celebrate it with a winter themed wreath. The best part of this project is it doesn’t need adhesive.


Instructions:

Gather your supplies. Because this is a winter themed project, I pulled mostly blue trims with the exception of the Dazzle Ivory and the Edinburgh trim. I didn’t want it to look so monotonous so I added those two to spice it up a bit. I also used different shades of blue so my wreath wouldn’t look too predictable. 

Plan a pattern of the ribbons on your wreath and start tying them down. I used a double knot on the project to make sure that my trims won’t unravel on me. 

Repeat the process until you’ve reached your pattern. Once you’re pleased with the pattern, repeat it until you have filled up the entire wreath with ribbon. This might take a while. I did this project while watching some TV. 

Once you’ve filled up your wreath with ribbon, Cut a 12” ribbon (of your choice) wrap around the wreath and tie the ends. Add a bow on one side and this will be your piece that will allow you to hang up your wreath. 

And here are some more details of my project….


I really liked how this turned out. The cuts are all different lending to a homemade feel plus the colors will definitely bring cheer to those cold wintery days ahead of us.
If you have scraps, like I did, make sure to save them for other crafty projects such as what I did with the cards I shared earlier this month.

Thank you for stopping by.
-Grace 

Supplies Used:
Dazzle ribbon, Ivory, 7/8”, Ribbons Unlimited Inc.
Ombre wired, Sky Blue, 1 ½”, Ribbons Unlimited Inc.
Country check, Royal, 5/8”, Ribbons Unlimited Inc.
Edinburgh, Dress Stewart, 1”, Ribbons Unlimited Inc.
Grosgrain, Copen, 3/8”, Ribbons Unlimited Inc.
Foam wreath- Styrofoam
Scissors