Everyone has a story to tell, here's mine sprinkled with some creative projects along the way.
Thank you for stopping by and I hope you come back again.


Friday, February 28, 2014

Little Man layout *Inspired by Stamping*

Although my Ipod photos are not the best quality, I love how I can easily capture everyday moments and those special time that I would have never been able to photograph because my big camera was not easily accessible at that time. Such was the case when my son came home from scouts with a made up mustache. He was funny and I love how he was open to being silly. Definitely shows that this little dude has come a long way from the time where everything stresses him out. 

Little Man Layout
I used some Inspired By Stamping stamps to add some fun elements on this page. I love how the chevron paper background brings in some "trendy" look to this page.

I added some of the fun hexagon stamps on three different parts of the page. I used different inks to add the designs to each of the hexagon shape.

I then used some white embossing powder to add the stamped phrases to the page. It easily conveyed what I feel for my little man!

I added some sprinkling of orange mist on the page to add some grunge and a bit of everyday imperfection to the page.

So there you have it. Thank you for stopping by.

Supplies Used:
Hexagons, Inspired By Stamping
Just Because Sentiments, Inspired By Stamping
Papers- (chevron) BoBunny; (blue grid) Prima
Cardstock- WorldWin Papers
Buttons- Amy Tangerine, American Crafts
Twine- The Twinery
Pen- Millennium, Zig
Die cut shape- Spellbinders
Letter stickers- Graphic 45
Tag punch- Creative Memories

Till next time,
Grace

Thursday, February 27, 2014

I love you because card *Inspired By Stamping*

Hello blog friends. Today Inspired By Stamping is sponsoring the latest challenge for  Cute Card Thursday. The theme for the challenge is Springtime and when I grabbed by Springs Lilac Paper from IBS, I knew instantly that I wanted to showcase that for my card. 

I love you because card
I used some green solid paper as a background for all the purple in my papers. I added a pink flower to break off some of the monochromatic look in this card. I used some purple rhinestone to create a visual triangle in the card. 


The sentiment is so pretty and perfect to give to that special someone that is always there for you.

So there you have it. If you want to participate with the challenge, click here. For more info on Inspired By Stamping products, please visit the site here.

Supplies Used:
Springs Lilacs Paper, Inspired By Stamping
I love you because sentiment, Inspired By Stamping
Flower- Prima
Rhinestone- Doodlebug Design Inc.
Photo Corners- Heidi Swapp
Twine- Doodlebug Design Inc.
Cardstock- Sources Unknown

Till next time,
Grace

Wednesday, February 26, 2014

Thinking of you always card *Inspired By Stamping*

One of my favorite things to do when creating cards is figuring out how to add and layer elements without making it look busy. I think I was able to pull that off with this card, what do you think?

Thinking of you Always card
I used a white cardstock as a base. Then I layered it with some beautiful papers from the Vintage Floral pad. I stamped some Ticket stamp images on white cardstock, trimmed and then used colored pencils to add some color to the design. I then layered a scallop purple die cut circle with another paper from Vintage Floral paper and then topped it off with a paper flower.

To create a visual triangle in the card, I added some rhinestone that matched the color of the flower. 

So there you have it. Thank you for joining me today. 

Supplies Used:
Vintage Floral Paper Pad, Inspired By Stamping
Vintage Tickets, Inspired By Stamping
Cardstock- (white) Walmart; (purple) WorldWin papers
flower- Bazzill
Rhinestones- Kaiser Craft
Border sticker- Hambly Screen Prints
Colored Pencils- Faber Castell

Till next time,
Grace

Monday, February 17, 2014

Sending you best wishes card *Inspired By Stamping*

Hello friends. Sorry I've been extremely quiet in the blog. Life is taking over. 

Anyways, today I'm sharing a birthday card I created using some Inspired By Stamping Vintage Floral papers and a greeting from the Trendy Circle Sentiment stamp set. 

Sending you best wishes card
I love the designs and color palette of the Vintage Floral. It's so dainty. I used it to cover most of my card. I added some leaves to add texture to it. I punched out a white circle from scrap cardstock and added my sentiment to it. I created some pen stitching around the inside edge of the circle to direct the eye more to the birthday greeting.


Supplies Used:
Cardstock- White, Walmart; (others) WorldWin Papers
Pattern papers- Vintage Floral, Inspired By Stamping
Stamp- Trendy Circle Sentiment set, Inspired By Stamping
Circle cutter- Creative Memories
Circle punch- Creative Memories
Rhinestones- Paper Studio
Leaves- Prima
Scallop circle die cut- Spellbinders

Till next time,
Grace

Wednesday, January 29, 2014

A Mother's Special Meal layout *Inspired By Stamping*

Hello friends. Today I would like to share with you a layout I created using the fabulous Vintage Rose stamp set and some of the beautiful papers from the Vintage Floral pad from Inspired by Stamping. 

A mother's special meal layout
 
a mother's special meal (1)
I love the soft feel of the paper pad and beautiful images on the vintage roses stamp set that I decided to combine them to document photos I took of my Mother's day special breakfast. Every year my hubby and kids prepare our breakfast for Mother's day and although it's not fancy or made with one of a kind ingredients, it still is special to me. You know why? Because I didn't have to make it! I love it when I get a break from the kitchen. Don't you?
a mother's special meal (2)
I noticed that vellum is making a big comeback in our industry so I decided to use that "trend" in this page. I stamped my beautiful vintage rose image on vellum and then used my colored pencils to bring them to life. I love the soft effect of the vellum against the background papers.
a mother's special meal (3)
I stacked some of the papers on one side of my page to make them stand out better. I also used this side to hold my title and journaling. Sometimes subtle papers are just the perfect backdrop for handwritten journaling, just like what I did with here with the pink dot paper.
a mother's special meal (4)
I also used the Fancy Labels 2 Die in this page. It helped me emphasize this beautiful quote on my layout. The quote is part of the Vintage Rose stamp set.
a mother's special meal (5)
A few flowers and trim finished the look.

To view more inspiration from the Inspired by Stamping team, please click here.

Hope you enjoyed my project share today.

Till next time,
Grace

Monday, January 27, 2014

Square altered frame *Epiphany Crafts*

Hello friends. I'm  here to share with you how I took the latest assignment from Epiphany Crafts of creating a “square” themed project literally and surprised even myself at how super easy it was to alter a thrift store find frame.

Supplies Used:
Epiphany Crafts Shape Studio Tool Square 25 SST-38
Epiphany Crafts Shape Studio Accessories Bubble Caps Square 25 SSA-40
Frame- Thrift store find
Cardstock- WorldWin
Pattern papers- She Art, Pink Paislee
Rubon- She Art, Pink Paislee
Quote- Essence, Ruby Rock It
Paint- Green tea, Americana
Thread- Coats and Clark
Sewing Machine- Kenmore
Adhesives- Thermoweb, Hampton Arts

Instructions:

1. If the glass in your frame cannot be detached from your frame (like mine), cover the glass part with washi tape. Sand the frame and paint with desired color.  Put at least three coatings to totally cover the black frame. Set aside to dry

2. While waiting for the frame to dry. Prepare the art that will go in the center of the frame. Punch out square papers from the She Arts paper pack. Add bubble stickers to each one to create the 3D accents. 

3. Measure the inside of the frame and cut a cardstock to fit that measurement. Cut out the quote from a Ruby Rock It paper. Mat with white cardstock and place in the middle of the cardstock. Create a 1” grid around the quote with a pencil and ruler. 

4. Using the grid that you’ve created, add machine stitching to the paper. NOTE: I only wanted the sewn grid to go around my quote and fit 20 square accents so I didn’t add stitching anything after that. Erase the grid marks.
5.  Add doily rubons on three different parts of the cardstock.
6. Adhere the quote using foam adhesive. Add the square bubble accents around the quote using some dot adhesive. Adhere the cardstock permanently to the frame using a glue gun. 

And here's the finished project again....


What about you? What do you picture creating with a "square" assignment?

Make sure you check out this project and other inspirations from the Epiphany Crafts team here.

Till next time,
Grace

Friday, January 24, 2014

Scrapbooking with Ipod photos

Happy Friday. Lately I've been thinking about how to use the photos that I've taken with my Ipod touch in my scrapbook pages. I know that since they have a small file size that when I print it out, it has to be smaller than a 4x6 so it won't look pixel-y. After some trial and error, I found that a 2x2 or 2x 2 1/2 size was the perfect fit for them. Here are two layouts that I made recently that features some of my Ipod photos...

Food and Fun
Having my images small has it's advantages. Since I had a lot of photos for our Father's day celebration last year, I was able to fit all of them in a 12x12 layout because of the image size. 


I did notice that the quality of the images is not the best. Some of them lack the quality that even when I try to "fix" them up in Photoshop, it just doesn't work. But I'm ok with that. My philosophy has always been that it's better to have "not so good looking images but captures the moment" than "pictures that are aesthetically spot on but doesn't really tell the story."

I made my own Polaroid frame by cutting out a square inside this paper, rounding the corners and adding stitching on the inside frame.


The Two of Us
Having small photos also allows me to make some pattern paper shine on my page. With this layout, I used a grid design and cut out papers to create a quilt like background. I then matted my two photos with white cardstock and then adhered them with foam dots to make them stand out against the busy background.

I used my Cameo to create part of my title and the hearts. I love having perfectly shaped images cut out from my die cut machine. That was something I never really got from the Cricut.


To make the yellow die cut letters stand out better, I highlighted it with black pen.

So now it's your turn. What have you done with your phone photos? Send me a link so I can check it out. I love gathering inspiration from fellow crafters.

Note: Most of the products used on both layouts are from Lily Bee Design.

Have a great weekend.

Till next time,
Grace

Wednesday, January 22, 2014

Some pictures from our January

Hello friends. I have noticed that this blog is being bombarded my crafty projects. It's not a bad thing but I'm sure the family (near and far) would like to see what we've been up to. So today I've decided to share a sampling of the photos that I've taken in the month of January. This is not all of them and to be honest, I've already missed a few days, making it seem like Project 365 for this year is another failure. But I'm not going to dwell on the negative and instead share you what's been "photo" worthy in our home as this time...

January equals new beginning/start for me so in the beginning of this month I photographed a random but "regular" thing that happens in this house...changing out of toothbrushes.

I was craving some burgers a few weeks ago and happened to score a pack of turkey burger patties on clearance at our local grocery store so I made some turkey burgers for dinner complete with homemade hamburger bun, turkey bacon and other yummy goodness!

Marcus lost a tooth earlier this month as well. It happened while he was flossing and the tooth just fell out! You can just imagine how excited he was to go to sleep that night so he can get his "prize" from the tooth fairy.

Just before school started up again, we had some good snowy days. The kids found some slopes in our backyard where they can use their sleds and have a little "snowy" fun. I love the expressions on their faces!


Another thing we did to "pass the time" during winter break was to play board games. On this particular night we played Sorry. :)

Another food photo. Lately I've been experimenting in the kitchen, trying to use up leftover items or things that we've had in the pantry for a while. Tonight I made my own dimsum soup using some potstickers purchased at Costco, bokchoy and ramen noodles. The family loved it and that means I need to write down the recipe so I can make it again.

I got a deep fryer for Christmas so we tried to make some homemade french fries this month. It turned out good but of course, there's room for improvement. I'm still searching for a good beginner's recipe for donuts. That's what I want to use my deep fryer for next. Any suggestions?

And finally a pic of me working hard at my homework. It's back to school for me as well and I'm excited to learn more about families in the two classes I'm taking this semester.

So there you have it. A little glimpse of how our January is shaping up to be. I have a lot more stories to tell but for now, this is all I can share. :)

Thanks for stopping by.

Till next time,
Grace

Monday, January 20, 2014

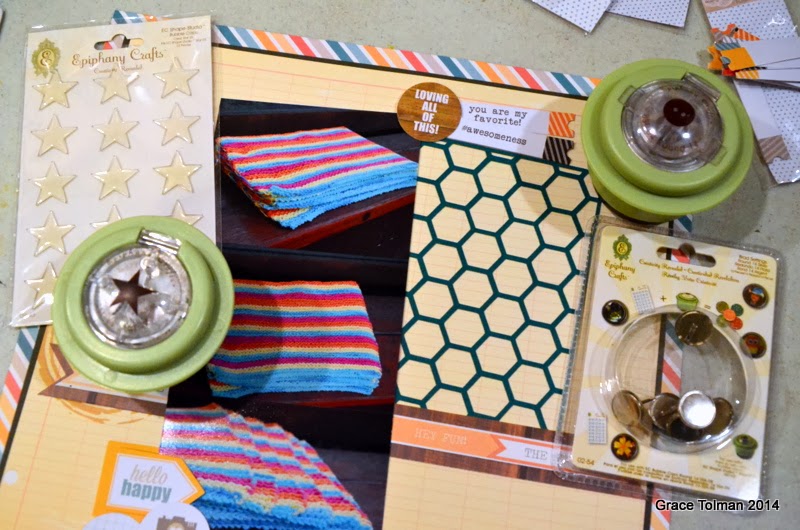
Handmade layout *Epiphany Crafts and Chic Tags*

Hi there friends. Today I’m sharing what I did with the fun products from Chic tags alongside some of my “go to” accents from Epiphany Crafts.

Instructions:

1. Build your page by layering Chic Tags papers and cardstock. Create the honeycomb paper from the die cut machine. 

2. Once papers and photos are adhered, you can start adding accents and embellishments. Create some handmade brads and bubble stickers using the Epiphany Crafts tools and bubble stickers. Thread some twine to the buttons you’ve created with the EC tool and stickers for a finished look. 

3. You can even use the packaging as part of your accent like what I did here as I created a round bubble sticker with one of the tag packaging. 

4. Another way you can personalize your bubble sticker is to transfer them on white cardstock and then punch out the accent with the Round 14 tool and adding bubble sticker with it. 

5. Add a vellum piece behind the title to make it stand out better against the busy honeycomb paper.
6. Handwrite your journaling.

7. Add rubon arrows on the top left corner and adhere all elements using dot and foam adhesives. 

here's another look at the finished layout....


Supplies Used:
Epiphany Crafts Shape Studio Tool Round 14 SST-02
Epiphany Crafts Shape Studio Accessories Bubble Caps Round 14 SSA-08
Epiphany Crafts Button Studio Accessories Buttons Round 14 BSA-10
Epiphany Crafts Shape Studio Accessories Bubble Caps Star 25 SSA-43
Epiphany Crafts Shape Studio Tool Star 25 SST-41
Epiphany Crafts Brad maker
Cardstock- WorldWin Papers
Pattern papers, rubons and die cuts- Chic Tags
Letter stickers- Thickers, American Crafts
Vellum- WorldWin Papers
Pen- Millenium, Zig
Die cut machine- Cameo, Silhouette
Twine- The Twinery
Adhesives- Thermoweb, Xyron, SEI

Make sure to stop by the Epiphany Crafts blog for more inspiring projects with Chic Tags.

Till next time,
Grace