Everyone has a story to tell, here's mine sprinkled with some creative projects along the way.
Thank you for stopping by and I hope you come back again.


Wednesday, February 15, 2012

Take Twelve-February

Hope you all had a great Valentine's day yesterday. Mine was wonderful but also very busy. I attended two class parties, tried a yoga/pilates class in the morning and had scouts at night. Whew! I did get a wonderful suprise of flowers and chocolates from my husband when I got home from my son's class party. He's such a sweetheart!

Anyways, today I'm sharing my Take Twelve photos. Did you participate? I hope you did because I really think that this program from Ella Publishing is a great way to "break in" that project 365 or project life challenges that a lot of people are in. Take twelve gives you the flexibility of choose just one day of the month- the 12th and picking only 12 photos to document your life at that time. Great concept!

Here's the breakdown of how my February 12th went down...
1. Got to sleep in a bit. Love this year's church time of 11 am. 2. After breakfast, I got the kids to help me fill up our grocery store's monopoly board. I play every year but I'm never lucky to win anything, maybe this year my luck will change. 3. A bag filled with all of my display, visuals and treats for my class at church today. 4. All dolled up for church. It's embarassing to say this but I only really put make up on on Sundays. It's a good thing I work at home because I don't like to dress up every single day. 5. A late lunch of leftovers. Our Sunday lunches always comprises of a buffet full of leftovers from the week. My kids have gotten used to this routine. 6. I made some sugar cookies with heart fondants as a treat to my students at church and I had some leftovers so we had some for our lunch desert. 7. After cleaning up lunch, I did some relaxing on the couch while browsing through the ads for this week. Lots of Valentine's day sale. 8. I called my parents. I try to talk to them at least once a week. Sometimes we skype as well. 9. For dinner I tried a new recipe called Sweet Potato Sausage casserole. I love the color combination of this recipe. 10. We had dessert again with this meal only because I wanted to use up some leftover egg roll wrappers. I used that instead of crepes for this warm banana crepe dish. 11. The kids made a huge mess of their rooms today so before going to bed, I made them clean up their mess. I love to see them work together. 12. After the kids went to bed, I worked on organizing reciepts. We were doing taxes this weekend and I had to organize my business paperwork.

To learn more about Take Twelve, click here. You can always get up to date info about everything Ella Publishing is doing here.

Till next time,
Grace

Tuesday, February 14, 2012

Love card + how to

Happy Valentine's Everyone! So glad you can come peek at the blog in this fine "love" day. I am off to attend my kid's valentine parties and share this happy holiday with everyone I will come across today but first, let me share with you a card that I had made. It was initially for an assignment but decided to go with another idea to submit after the this card was done. But I dont' like "wasting" anything so I kept the photos and you, my lovely blog readers, get to see the project along with the step by step photo first!

Love Card
I made this card extra humungous sizing at 6x6". I've never done a card this huge before but I felt like if my hubby is "just" getting a card for Valentine's day, it should at least be the biggest one he gets! right?
I did a lot of layering in this card. Plus I got to use these fun heart shaped buttons from Epiphany Crafts. Love it when I get to use up things I've been hoarding for a while.

So here's the low down on this project...

Supplies Used:
Cardstock- WorldWin (white)
Pattern paper- Promise Me 6x6 pad, SEI
Textured cardstock- Jenni Bowlin Design, Core'dinations
Ribbon- Hobby Lobby
Stickers- My Little Shoebox
Chipboard flower- Happy Go Lucky, Pebbles
Baker's twine- Maraschino, Twinery
Heart buttons- Epiphany Crafts
Scallop border punch- Creative Memories
Photo Corners- Recollections
Adhesives- High Tac, U cut it foam, Extreme mini squares, Extreme Squares- Glue Arts

Instructions:
1. Make the card (6x6) out of white cardstock.

2. Cut out the "love" bingo card out of textured cardstock.

3, Sand the cardstock to reveal the numbers.

4. Add a punched border to one edge of a pattern paper.

5. Measure the pattern paper with the scallop edge 1/8 smaller than the card base. Adhere that along with the bingo card to the card base. Add a striped pattern paper on the right edge as well.

6. Cut a piece of ribbon to 6" length. Adhere to the bottom of the card. Measure the inside width of the ribbon and cut a piece of pattern paper to cover the inside and adhere.

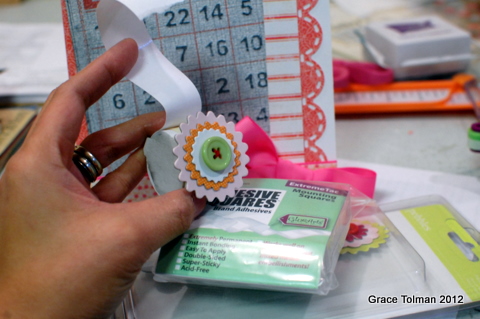
7. Make a bow from ribbon and adhere to the right edge of the ribbon strip using extreme square adhesive.

8. Add the chipboard flower accent to the center of the bow.

9. Add the stickers to the card using foam adhesive.


10. Make your own heart buttons with pattern paper and Epiphany Crafts' heart buttons. Make three buttons.

11. Thread baker's twine through the buttons.

12. Add some more foam adhesive to the back and adhere to three spots on the card. Note: I took off the green button from the chipboard flower and replaced that with one of the heart buttons to match my theme.

13. I felt like the angled love bingo card piece was 'floating' on the card so I grounded the look by adding photo corners to the top of it.

So there you have it. I hope this card inspired you in one way or another. Happy Valentine's Day everyone. :)

till next time,
Grace

Monday, February 13, 2012

Awesome mini album + Foto Matr

Hello Monday and Hello blog readers. I have to say that I LOVE MY JOB! I love that I get to document my family's life, be creative in the process and share my love for memory preservation to everyone that is willing to listen. I love how I can make a mini album like this one below to document a random trip to Chuck E Cheese with my kids two years ago and use fun products like the kit iems included in the Paper Bakery February Add on kit (which goes live for sale on the 15th). You can see more photos of this project in the PBK blog post today over here.


Then there's this really cool product that I learned about from WorldWin. They have come out with a fantastic way of scrapbooking where you can alter to your specific needs. I'm talking about the new FotoMatr. It's a scrapbook system (made of great quality kraft cardstock) and inserts that you will flip for! As a papercrafter and story teller I love the options of the filler pages which can be your regular 8x11 page with all sorts of layout configurations to the die cut folders and pocket holders. The possibilities are endless on this one.

Peter of WorldWin did a little show and tell on the new product at CHA Winter recently and you can learn more about it by watching this...

Check out the FotoMatr site here too.

So there you have it. Memory preservation is my middle name and I'm so blessed to be a part of this industry.

Till next time,
Grace

Friday, February 10, 2012

Heart Healthy Altered Journal + Tutorial

Hi friends. Last week, Ella Publishing had a great three day event leading up to "wear red Friday" to remind us of the importance of "heart health" which we are celebrating this month. I had made a few projects for the event and one of those was this altered journal...

I wasn't sure what kind of postings were needed so while in the process of making the journal, I took some step by step photos. It was never used for the blog post so I thought of sharing it here at the blog. :) Here's the process.....


1. First I gathered up my supplies. I used a travel journal from SEI and a Studio Calico kit. When making projects like this altered book, it's great to use products from a kit or collection. That way you know that all the products go well together and it makes the process go faster.

2. Next, I measured the front and back covers of the journal. I then trimmed some papers that is about 1/4" smaller than the book covers. This will allow me to still show off some of the great brown chipboard color of the original cover.

3. Because the right edges of the book was cornered, I did the same with my pattern paper to make it match the ends.

4. Then I punched a decorative border on a strip of light colored paper and added that strip to the left edge.

5. I cut out a block of pattern paper which will hold my title, matted that on a light colored pattern and trimmed the edges with scallop scissors.

6. It's Stamp month over at Ella Publishing this month as well so I incorporated that technique with this project. The Studio Calico kit had this mini set in it and it was the perfect sentiment for my book. Notice the space in the arrow that was not fully stamped? Don't worry about that, I'll show you how I covered my booboo later.

7. Then I added some letter stickers onto lined paper, cut them into strips and added notches to the right edges. I also outlined the letters with black pen to make them more noticeable against the busy backgrounds.

8. Remember that arrow stamp with some open space that didn't get stamped? Well I added a chipboard butterfly with a brad in the center on that space. Now no one will ever know that I made a mistake there. *wink*

9. I added more butterflies and a little bit of handwritten journaling and called my front cover good!

10. The back of the book had an elastic band through it to enclose the book so I mesured around it, cut a slit and punched a hole where the elastic threads through and then adhered my paper. This way, everything is perfectly lined up against each other.

11. I then decorated the inside covers and section sheets with more pattern paper. I rounded the right edges to match with the design of the existing papers/sheets.

12. I then decorated these section pages with more stickers, chipboard butterflies and tape. I found a rubon set (in my stash) that had some great motivating words and I added that to the pages as well. Those words and phrases would be a great motivator for me while I use the book.

13. Here's the look of the second section header page.

14. the third section header page

15. And the back inside cover.

16. With the back, I just added a die cut shape layered with a punched pattern paper and butterfly chipboard with a brad center.

So there you have it. I hope this inspired you to make something crafty today. Have a great weekend.

Till next time,
Grace

Thursday, February 9, 2012

trying something new as a family

Woohoo for Thursday. I love the ending of the week, it gets me excited at what stories the weekend will bring and what fun adventures I will be enjoying with the family.

Speaking of adventures, last Saturday my family and I tried something new. We went roller skating! Mitch had the grand idea. He wanted us to try something different. At first when he presented the plan to us at the dinner table, I was stunned and I bit scared. I mean, I've never roller skated in my life and only went ice skating once (yes I know I have missed out on a lot of fun stuff growing up but that's my story and there's really nothing I can add to that).

Anyways, so the snow came on Friday and although part of me was hoping that our little "Saturday excursion" would be postponed, I didn't show it. I wanted my kids to be excited to try something new and the only way I can make sure that they were up to the "challenge" was if I was up to it too.

We drove to our local skating place, walked in, paid our admission and skate rentals and I got ready to be either (a) embarass myself infront of my husband, children and strangers or (b)find out that I had a hidden talent in skating that I will yet discover.

Here's some photos that I took in between skating. We had to keep our stuff in a rented locker for safety so I was not able to snap the shutter all the time. Although now that I think about it, maybe that was a better choice so I wouldn't have any photo evidence of how "challenging" this was to me. Hahahahaha!


they were having a TON of birthday parties while we were there and they took a break from the public skating to sing and dance to the birthday celebrants.


and here I am taking a breather from the experience.

Speaking of the experience, here's what we found out...

Mitch CAN still skate despite not doing it since high school. He's not the fastest one out there but he sure can whirl around with just a few falls.

Marcus was resilient! He was falling every other second but I was so amazed and impressed at how he'd come right back up and do it all over again without any frustration, fear or worry. Later on I find out that he had a kid help him and show him the ropes and by the end of our two hour session, he was skating away from the wall. Super!

Maddie was also impressive. She was holding onto the rails a few times in the beginning but by the end she too was skating away from the wall and holding her ground. She was so upset when we had to leave and asked when's the next time we would skate again.

And as for me....well, let's just say that I know my strenghts and weaknesses and although I tried. Really I tried! I didn't leave the wall or the railing the whole time I was in the rink. I was embarassed a few times and fell flat on my bum more times than I can admit to but I wanted my family to see that I really tried and at the end of it...I had fun BUT I know deep down inside of me that skating and me don't mix! Sadly you can't teach this old cat a new trick!

So there you have it. Lesson learned here....always be open to trying new things and Grace and the skates don't mix! *wink*

Till next time,
Grace

Wednesday, February 8, 2012

Valentine Knitted Banner + Tutorial

So today I'm sharing a fun project I recently finished. A short history before we continue though....about late November of last year, I was in my local grocery store and for some fortunate reason was buying time before heading out to the check out stand. That doesn't happen often, I'm usually trying to run in and out of stores when I run my errands but during this time I had no where to rush to so I stopped at the magazine rack. I browsed through a copy of the Cottage and Bungalows magazine and came across a very cute and what seemed to be an easy knitted advent calendar. After studying the photos, I decided that I would make one myself. So without any patterns and directions I went ahead and made some knitted pouches.

Unfortunately Christmas came and went and I still wasn't done with my 25 pouches. It got me bummed for a few seconds but then the light bulb hit! The color scheme that I chose was red and white. If I won't be able to use it for Christmas maybe I can finish it before Valentines and just add pink letters instead of my initial idea of green. And then another thought came....and if I can't finish it by Valentines, I can use it for Fourth of July which then I can just use blue for the lettering! And if I still can't finish it then, I will have something ready for next Christmas!

So the plan was done and I continued to work on my pouches and thankfully got them done by mid January and here's what I made with them....


I layered some felt circles with cardstock die cut letters onto my knitted pouches. Talk about different layers and dimensions!


Because of all the possibilities I have thought about for these pouches, I decided to use velcro to attach the felt circles with the banner titles. This way, I can just change it up when the next holiday comes around.

I love that with the pouches, I can stick things in them for some kind of day to day treat or surprise. Ideas are already swirling in my head!
and because I love to "share" in this blog. I decided to create a tutorial for ya!

Supplies:
yarn to complete at least 25 knitted pockets/pouches
size 10 yarn
pink felt
pink and red cardstock
3 white buttons
thread and sewing machine
velcro
pinking shears
baker's twine or thin ribbon
needle
die cut machine or letter templates (you can also just hand draw the letters if you want)

1. *Before I go on, I want everyone to know that I am not a Knitting expert. I don't think I've even passed the "begginner" stage and I tried to find a pattern or tutorial on my world wide web that would be similar to what I've done but I was not so lucky. So here's my process, if it's not easily understandable, I strongly suggest to go to your favorite knitter and ask for some tips. And if you find something that I can link here, please share in the comment section as well. I will not get offended at all.:)

ok so onto the knitting process....I casted 30 stitches and then knitted until my rectangle was about 4" in size. Then I binded it off. I folded the rectangle to make a square and sewn together the bottom and right opening to close the pouch, leaving the top open. Repeat this process 24-25 more times making sure you have about the same red and white pouches.

2. Next, I grabbed a small circle cutter template ( you can use bowls and small plates for this process as well) and traced circles on my felt pieces. For my Valentine banner, I made 16 circles.

3. Then using my pinking shears, I cut out all of the circles.

4. Then I layed my pouches on the table, alternating the colors and then layed my felts on top of them.

5. Next, I machined stitched a straight stitch on the inside edge of my circle, about 1/4". I was not particular if my circle stitches were "perfect" because I like the homespun feel of imperfect stitches.

6. Then I added velcro to the top and bottom parts of my circles which I then adhered to the knitted pouches. The velcro that I chose had sticky backs which made adhering them faster but if you have the regular kinds, I'm sure you can hot glue them and it'll be perfectly fine.

7. After that, I picked a simple font on one of my Cricut cartridges and spelled out Be My Valentine. I also cut out three hearts from red cardstock.

8. Next, I grabbed three white buttons, threaded the centers with baker's twine and tied them into a bow.

9. Then I hot glued the letters, hearts and buttons onto the felt circles.

10. And then I threaded the twine through the pouches, creating two banners- one with the "be my" and three hearts and another that spelled out the word "valentine".

as you can see, I didn't use all 25 pouches in this project and that means that if you are inclined to making this project, you don't have to! All you'll need is 16. Even better right?!

So there you have it. I hope this has inspired you to create a cute banner for Valentines or even take up knitting! Heck, if I can do it, anyone can. :)

Till next time,
Grace